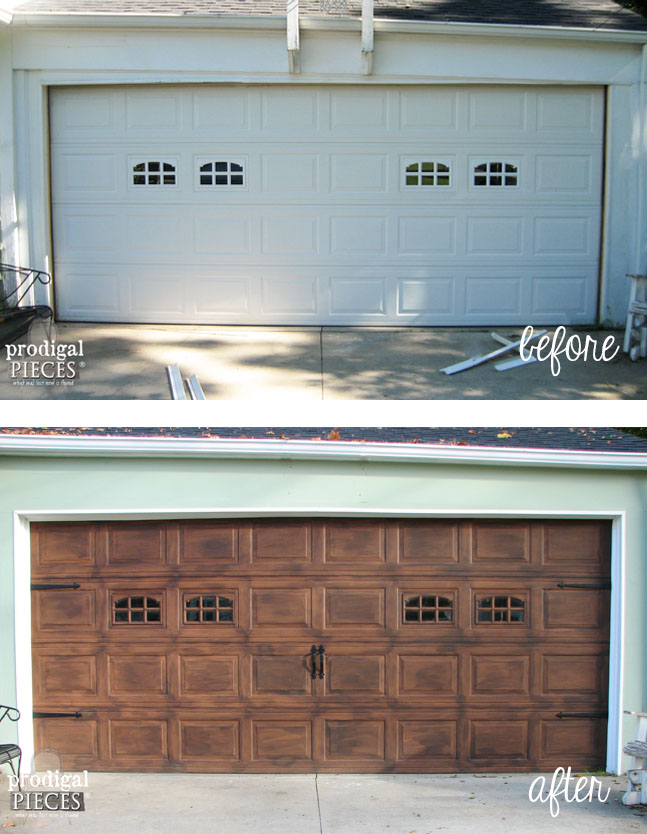
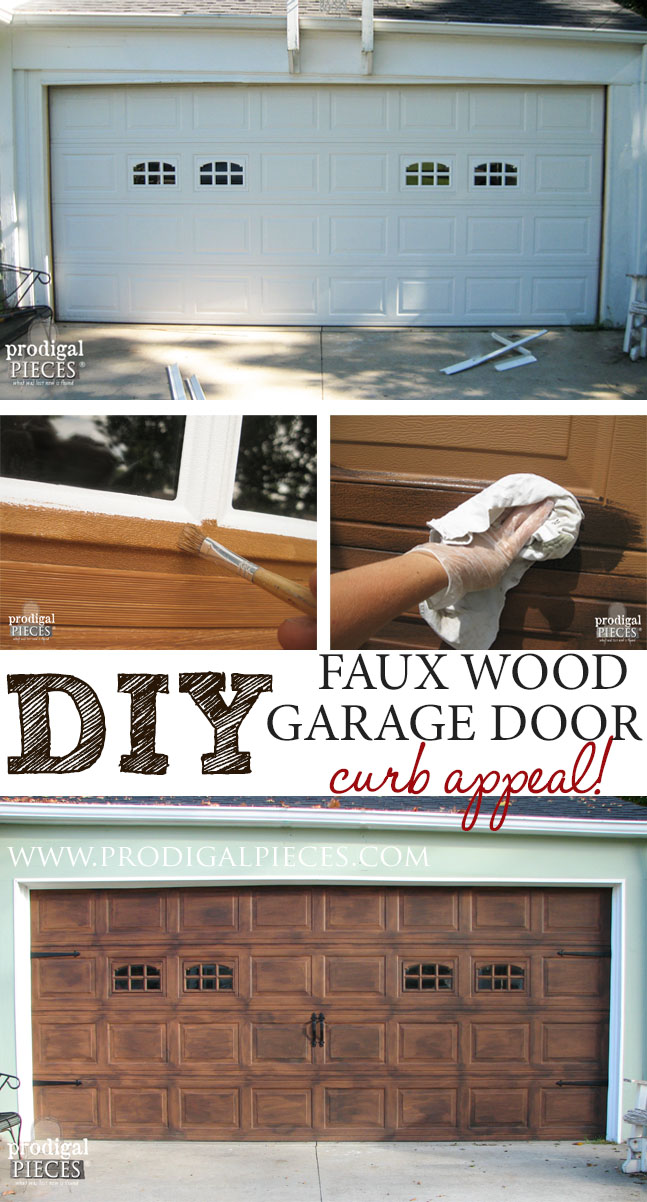
It has long since been my husband’s and my desire to give the exterior of our home an overdue makeover. When we originally purchased our house we didn’t have a garage, but a carport with lattice as a wall on the one side. A few years ago, we walled in the garage and added a builder grade garage door with carriage windows. That suited our scheme, but once we got to work adding a new color and stone veneer, that BIG white door just didn’t suit the rustic feel we were after. I wanted a faux wood garage door, and I decided to DIM (Do It Myself). Here it is in its prep mode.
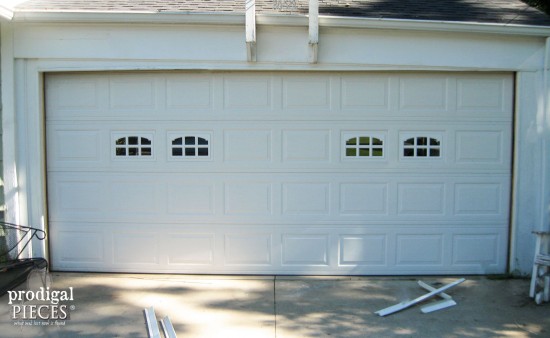 I wanted some curb appeal, some I-don’t-look-like-I-came-from-the-big-tool-store-type attention. Mind you this was a vast improvement over no garage door which showcased our auto loveliness.
Since it is the norm for me to add texture to the pieces I paint with glazing for my online shop, one day I thought to myself, “Why not the garage door?” So off I went to create a faux wood garage door.
DIY TIME
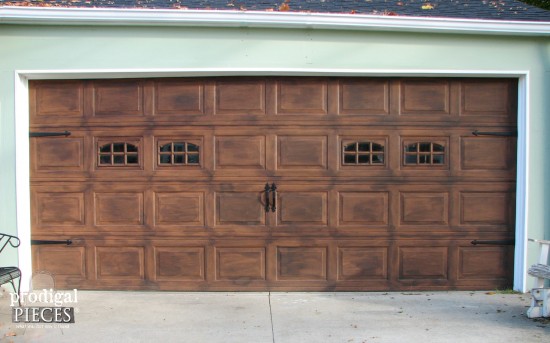
Luckily our custom garage door we chose a few years ago already has a wood grain inlaid to the panels. Then, with some paint, I made our garage door look like this…
Want to give this faux wood garage door a try? I’ll show you how.
Here’s what you’ll need:
- burnt orange, caramel flat exterior paint – the paint I used was a second’s paint from Home Depot called Caramel Swirl. Since this is your base, you don’t have to be exact, but in a similar color family.
- dark chocolate, brown flat exterior paint – again, another seconds can for me, but just pick a deep contrasting brown.
- cotton rags (old t-shirts work the best)
- gloves
- paint brush (& artists brush if needed for windows)
First, check the back side of your garage door for a label that will give you instructions on how to prepare your garage door for painting. If no label, just make sure to fully clean the surface of dirt and debris. Also, remember I already had a wood grain design on my door…this could be done on a flat surface, but would take different steps to get the desired effect.
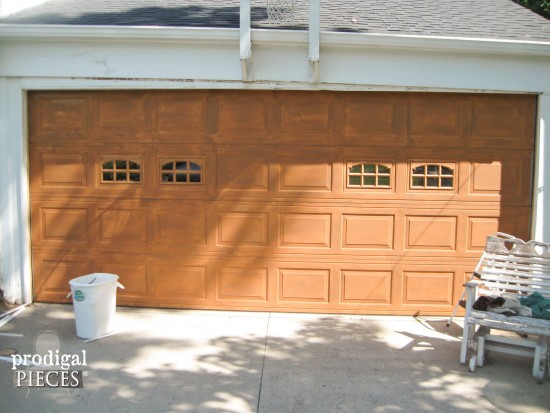 In the above photo, I’m showing that the bottom three panels are second coated with the top still needing a second coat. My neighbor’s little boy walked by and said, “I like your orange garage door!”
Ummm…yes it was orange, and yes my neighbors thought I was going to leave it like that. Gotta love neighbors…can I hear an amen?
DETAILS
Using an artist’s brush to get to the fine details helped make it easier to get around those windows. I’m also not the type to use tape to mark it off with painters’ tape, but you could do that if you like. I worked on a paint crew and have learned the nuisances of painter’s tape, and that a steady hand prevents you from needing it.
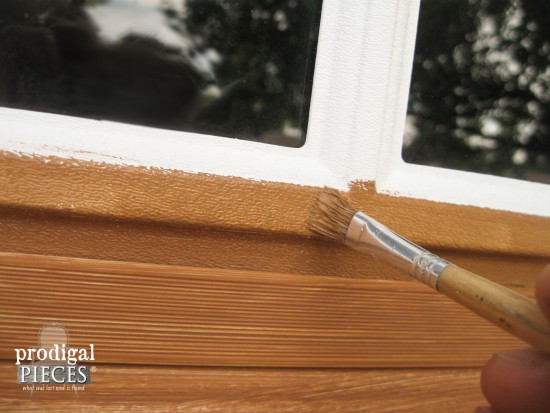 Additionally, make sure you’re applying your coats in low heat sunlight and try to avoid the hottest part of the day. The curing will go much smoother in a cooler setting. We have a southern facing garage and I had to make sure to do it early in the day before the paint would bake.
On to the fun part…adding the depth. I don’t believe in buying super-expensive glazing, I just make my own. Glazing is really just paint with an additive to lengthen the dry time of the product. I have just learned to work around quickly and in small batches. So buy a dark glaze if you want to “buy” more time.
GLAZING
As far as mixing my own, I’ve had several questions as to the amount of water I add to the paint. I don’t have exact measurements since each paint is different, but I took about 2 cups of paint and mixed in roughly 2 tablespoons of water. It’s just enough to give it flow and the consistency of milk. If it’s too thick, add tiny amounts of water, and if too runny, just add more paint.
Okay, so you’ll need that homemade glazing you made, some cotton scrap cloths (t-shirts), and a paint brush. The technique is simple, but takes a bit of time.
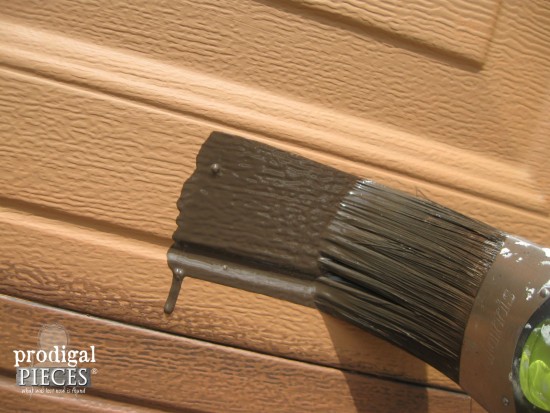
First, apply the glaze using a fully loaded brush and work in small areas at a time. For me, I worked in one panel at a time. What is more, feel free to try a test spot before you go whole hog.
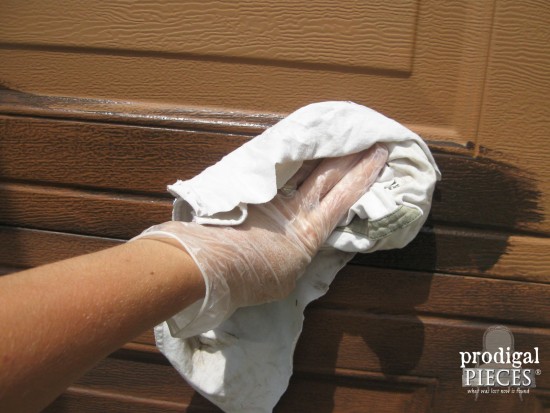
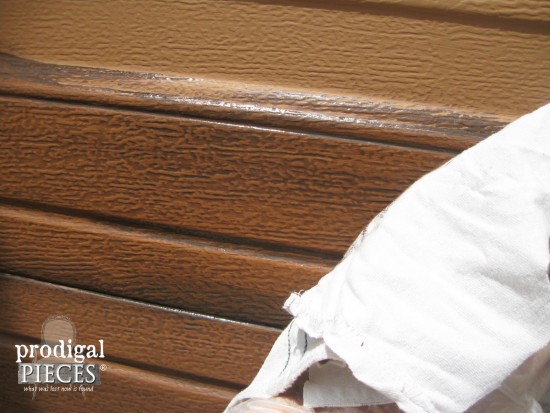
Then, after covering one panel, grab your cotton rag and then lightly wipe the glazing off. You’ll be leaving some of the glaze behind to fill the grainy texture, giving it the wood grain effect.
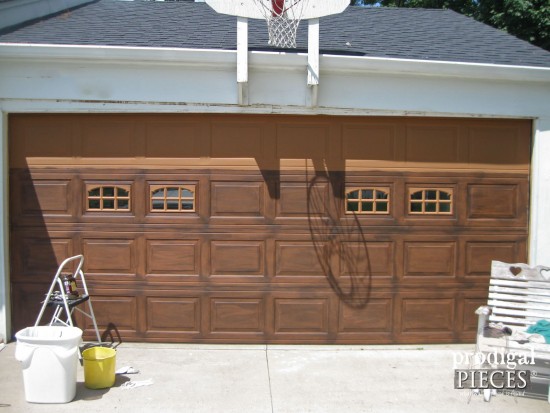
Here is my partially finished door. Again, the neighbors are peering out their windows wondering what in the world I was doing. The entire time I’m doing this I’m singing to myself John Denver’s song…”country road, take me home, to the place where I belong…”
ALMOST DONE
My heart is in the country!
All it takes is only one coat of glazing, the garage door is finished and just needs a couple of days to cure.
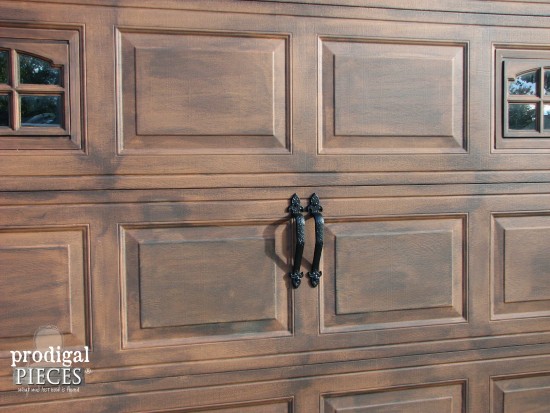
Since a rustic look was what we were going for, we also added some carriage door hardware. Not only can you find it at any home improvement store, but it also comes in different variations.
I just love how my faux wood garage door came out. A few mistakes I made was trying to touch up some spots – better left alone. ahem. But…I learned and am so glad I took this project on.
THE REVEAL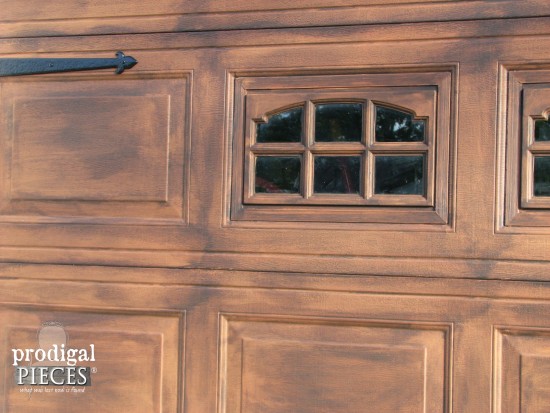
Now the neighbors are oohing and aahing and wanting theirs done too! ha! I love it.
 Got questions? Please feel free to ask and I’d love to see yours if you give it a try!
UPDATE: For those of you that have a flat surface door to work with, you can use wood grain tools using the same color that you would use to glaze with and create the grain that way.
3 YEAR UPDATE: The garage door is holding strong, and I show you the 3-year anniversary update HERE.
Before you go, be sure to sign up for my newsletter. Until next time!


Your garage is beautiful!! Wish you were my neighbor!☺
I love it! I wish you were my neighbor so I could hire you.
Looks great, Larissa!
Excellent job. Your new “carriage house” doors look great. So clever.
Your garage door is beautiful! I love the makeover. We’ll be featuring this over at Someday Crafts tomorrow! 🙂
Nice job! I mite have to try that with my doors.
Marie @ http://www.fortledbetter.com
What an awesome idea! I wish I had garage doors that were worthy of that kind of makeover – ours barely goes up and down and is ancient!
Beautiful!
I am doing this. My husband’s garage is in desperate need of a complete makeover and this is going to help. Thank you for sharing.
I seriously thought this was professionally done and was going to whine about how no one in our area does this kind of work. Now I not only CANT complain but have no excused not to try this myself. I already dislike our garage door. What’s the harm in experimenting with it!
-Jacque TheDIYVillage
I love your garage doors & would love to have the same awesome outcome…could you tell me what the exact names of the colors were that you used, what brand & type (gloss, satin, etc) of paint & where you purchased it?
Thanks! Can’t wait to try this in the next month or so!
-Janet
Easy to follow directions! Thank you for teaching. I look forward to trying this on my garage and front doors!
I’d be happy to paint mine too… but hubby is sure that it won’t take long till weather will do a fine job on it and it will just be a chippy yucky looking mess. That’s a lot of work to just look ‘bad’ in a few months time – which is what he is suspecting. And I’m sorta thinking he could be right. Do you have thoughts to keep it looking great for LONG?
Hi Joyce! So glad you stopped by. :o) Mine has been up for over a year now and is holding strong. I worked on a paint crew in college and learned so much about paint. I used a hardy Behr exterior paint and self-made glaze from exterior paint on our southern facing home. I don’t forsee it chipping and only think it will wear as a normal exterior paint will with time. Hope this helps! Blessings, Larissa
I am so inspired by this project! I have the hardware, but will not install it until I redo the doors!
Wahoo!! Thank you, Tenya!
I love how your doors turned out …. you did an amazing job!!!! I am doing my “homework” right now researching on how to do ours (we have a double wide and a single garage door) we just decided on colors tonight (getting excited) but was wondering how you make your glaze? And, does that help make it look more grainy? Thank you for sharing your steps with all of us. ~ Karen
Hi Karen! Glad to hear you’re giving it a try and I’d love to see your transformation. About the glaze, I just added the slightest bit of water to a darker paint which fills in that faux grain design and makes it the grain pop out. Make sense? It just creates that texture needed to give the wood effect. Happy Painting! :o)
What color did you use to make the glaze? What was the original paint color before you added the watering down process. I saw you used caramel swirl but I never saw a mention of the darker paint color.
Hi Joe! Thank you for contacting me. The color I used wasn’t a particular shade, but rather just a chocolate brown. It was a seconds paint at Home Depot, so anything in a darker shade of brown would work. I didn’t state a color because I didn’t have one and it may not be always available if I had. Please let me know if you have any additional questions – thanks!
This comment has been removed by the author.
Hi Larissa, wondering if your base coat was a flat paint like your glaze paint? Thank you!!!
Samantha
Great job! I am going to do this as a summer project at my home. Thanks
Thank you, Chris! I am going to do an updated shot as soon as the snow melts to show that my garage is still going strong after nearly two years. 🙂
I would like to make a cedar color on my garage door. What colors would you suggest I use? Having trouble deciding on the colors.
Hi Melissa! Can you send me a sample of a door you would like yours to look like if it’s different than mine? Email it to [email protected] – thanks! 🙂
I’m painting a metal panel exterior door an want an aged look. I have a teal exterior paint and a dark brown for the antiquing effect. The glaze they have at the box stores are interior. I was going to mix my brown exterior paint with paint thinner or mineral spirits, brush it on and wipe away ? Will that work ?? Amy suggestions ?? Thanks !!!
Good question. First, make sure your door is clean and free of debris and you have a good adhesion temperature – see can label for more info. Second is the paint you’re using an oil or water based paint? (does it clean up with water or mineral spirits?) If oil, then use the thinner or mineral spirits sparingly to thin. I have not tried oil based paints, but the only difference would be dry-times and fluidity. My door is metal but started off with a factory coated finish, so keep in mind if you’re working on raw metal you would need to prime. Hope this helps!
love how this turned out! I recently did a faux wood treatment on my clients vinyl screen door and ever since then, I’ve wanted to do this to our garage door. Yours looks great! And amen to moving to the country! My husband and I really want to move to the country too! I hope we all are blessed to do so in the future! Love ur work, I follow u on IG too.
A country gal after my own heart. 😉 Thank you, Deanna. You should give it a try on a garage door…it’s amazing what paint can do!
Looks great. I’m trying mine and my metal front door as well. Did you use polyurethane? If so what shine satin,gloss?
Thanks! Since I used an exterior paint, there was no need for a poly, same as if you were painting your siding on your home. Let me know if you have any additional questions. 🙂
your door turned out beautifully ! I have been doing this as a home stager for several years now and I like to finish with a coat of Matt verathane to seal it. You would not want it to fade quickly or stain easily. Think about it !
Thank you! Yes, you could seal it, but mine has lasted 3 years now with no fading or staining in our south-facing, winter-beaten location. I really believe the type of paint you use is the key. Thanks for sharing! 🙂
So I tried giving my garage a faux look with the gel stain technique. After 2 panels I hate it. It turned out muddy and didn’t look faux at all. I am pretty crafty and this was a fail. I think it’s from the thickness of the gel stain. I am thrilled to come across your tutorial. As soon as I remove the stain and prime my door again I will be doing your technique for mine. Again thank you for sharing this! Wish me luck!
So glad you stopped by, Rhonda. Yes, I saw that tutorial and that would have been a bear for me…all I could think of was “sticky”. Our door has been done for nearly 3 years and it’s still holding strong!
What would you do differently, my garage door is a flat wood with no design, such as woodgrain
I have seen faux wood grain rollers as well as brushes like these: http://amzn.to/1nVA5co (my affiliate link)
I just came across your tutorial. Great info here! I have a dark brown door already and wondered if you thought if I could just get a bit lighter color for the glazing? It would just give it a reverse affect right? Trying to not paint the whole door if I don’t have too.
Yes, reverse is correct. Try a spot and if you don’t like it, paint it back dark. 🙂
Hello,Can you tell us how to do this to a flat garage door. Ours has no woodgrain at all. Thank you
Hi Sabrina! There are wood grain brushes and sponges that you can get through Amazon that might work. Here’s my affiliate link: http://amzn.to/1Nu5A9C Let me know if that helps! 🙂
Just to clarify, if I don’t have the wood grain already on my garage door I can use the wood grain roller (for example) for the darker coat and that’s how I get the wood look?
Yes, I would paint my base coat the same as I described, and then using the darker glaze color, go over top with the wood grain roller. Hope that helps! 😉
I love it, love it, love it! Wow!
Woot, Woot! Thank you, Ivory!
Hi Larissa! This was such a beautiful project that I tried to do it myself. It turned out nicely but I think I failed to remove enough glaze. It’s pretty dark. Any suggestions for making it lighter now that it’s dry?
Thank you!
Hi Amanda. 🙂 Thank you for the compliments. Would you mind emailing me a picture so I can take a peek? [email protected] Thanks!
So did you actually use two different colors of exterior flat paint? You mentioned caramel swirl and a dark brown as well. How did you do it? Apply one color first, let it dry then painted the dark brown on top?
Thanks so much for your help!
Yes, one is the base color (that orange color in my pictures) and the other is the glazing (the chocolate you see me brushing on). I mentioned letting each layer cure (2 coats of orange) and then applying the glazing and quickly wiping off to leave it remain in the crevices. Practice on a piece of carved trim or picture frame if you want to get the idea. Hope that helps! 🙂 Feel free to email if you need to: [email protected]
If I use the Glazed Pecan by Behr do you think I would have a similar outcome?
Nailed it! 😀
I see that you have handles. How does the door still roll up
Since these are made for garage doors, there is plenty of clearance when it bends and rolls up. I was hesitant too, but if you watch it run, there’s plenty of room. Hope that helps. 🙂
How did you do the panels? There’s so many different ways to do it. Tape it off or paint all in one direction?
I just paint the panel and rub off in the direction of the grain. Hope this helped you, Nicki. 🙂
I noticed on your garage you faxed, some areas look darker in spots, I like that. How did you achieve that look?
It was sort of accidental by layering. When the layers overlapped that is what was the result. 🙂
Great idea! Other sites suggests to use an oil-based primer but you did not. Has the paint stayed on the door well without the primer?
Thanks
Yes, it is fine. You can see my update here: http://prodigalpieces.com/refresh-old-wood-easily/
Can you post a picture of the barcode on the paint can.
It’s the round sticker that Home Depot puts on with the dab of paint they smear on.
We could take it to Home Depot and have them scan it in their paint center for the exact colors.
If you were to post it, it would help to get a color as accurate as your beautiful work.
Thank you.
Hi Robert, this post was made about 3 years ago and I used up the paint not long after, so I have no idea what the color would be. Sorry! 🙂
I’m trying for red oak look on my doors to tie into my redish fireplace (I’ve painted the rest of brick of house dark grey) what 2 colors do you recommend I use to achieve red oak look?? Thank you ?
Are you wanting a natural red oak look (unstained)? That would make the difference. Feel free to email mean inspiration pictures: [email protected]
I am in the process of doing this project right now. Just wondering how you did in the bends of the door?
Good question! I would open the garage door panel by panel, pausing at intervals to be able to reach inside. Hope that makes sense!
How beautiful! I am trying to work up the guts to do it. I have read so many opinions but keep coming back to yours, brcause of the beautiful natural look and also the simplicity of your instructions.
Thank you, Anita. You could always try just a panel or a square to get the feel for it. I’m excited for you!
I just finished my doors! Wish there was a way to share the picture. Thanks for sharing your expertise!
Hooray! You can send them to me via email using the contact tab at the top of my blog. I’d love to see it! 😀
Is your hardware real or the magnetic kinds they have now?
They are anchored in, but the magnetic ones work just as well.
Wondering how long to wait before we put the glaze on! We just finished up our second coat! Thanks so much!
Congrats on the first steps! 😀 Just follow manufacturer instructions on letting your base coats cure, and then have at the glaze. It normally is only a couple of hours.
Hi, just found this tutorial. So beautiful. I’m assuming you see white briefly when the door opens and closes? Or did you paint that part too? Thanks so much.
Thanks! I would stop the door at intervals and paint the inside seam and let cure.
Larissa,
Thank you for sharing this project. I am wondering if it would be possible to use a flat for the base and a satin for the glaze?
My pleasure. You most certainly could. Just keep in mind that the stain will reflect in the sunlight or in headlights if that’s the look you’re after.
Hi, what does “seconds” mean? You use that term when listing out your materials… “seconds paint” and “seconds can”. What does that mean?
It’s a mis-mix from a store. Someone custom requested a color and they didn’t like the mix, so the store sells it at a discount.