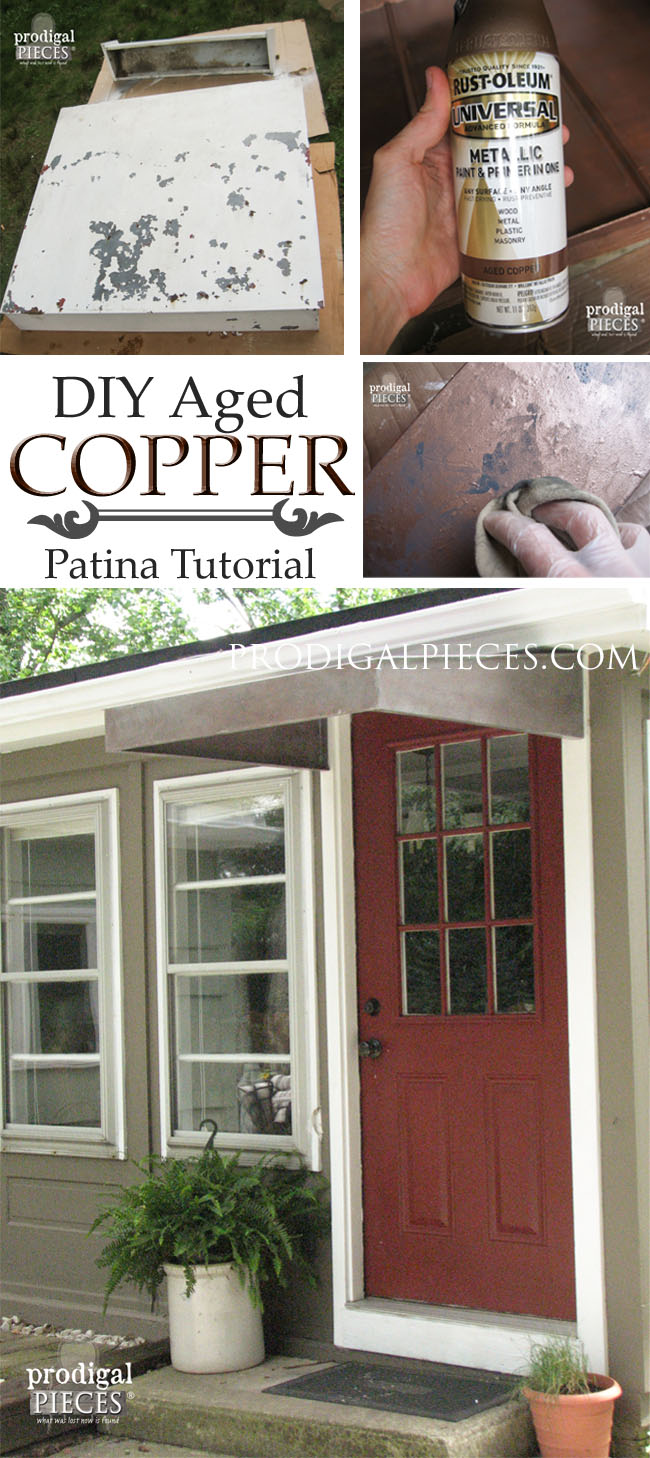
A paint brush has been my best friend this summer. (when isn’t it, really?) I have painted our entire exterior of our home, twice, by myself. That doesn’t include the furniture pieces I have done as well. I guess that makes me a lean, mean, paintin’ machine…or just plain nuts. ahem. One of the changes I wanted to do was to fix up an old aluminum awning on our back door with a DIY aged copper patina. Totally 1950’s style, ugly awning. And, while I was at it, I thought I would also dress up an aluminum window box I took off the front of our home and was planning to put on our shed. Nothing goes to waste around here.

Since our home is taking on a more rustic appeal, I wanted to give these metal items an earthy look. In my mind, there was no other way to go than an aged copper look. You know, the lovely copper color with a green cast to it…oooh…perfect patina.
DIY TIME
This time, though, a spray paint and a rag are my best friends. Follow along and I’ll show you how to make anything; wood, metal, plastic, into a faux tarnished copper piece.

I have really come to love the newer Rustoleum spray paint products with all the different metals…hammered, aged, and rustic, and it sticks to anything. Right away I knew I wanted to use their Aged Copper spray paint. These cans are great! You can spray in any angle, whether upside down or not, the flow never cuts off (unless it needs shaken)

Next I sprayed like none other. (Make sure to do this in a well-ventilated area!!)
Tip: When spraying a surface or object, make sure you begin spraying before you hit the piece and continue until you’re off the piece – working in back-and-forth motions. This will give a nice even look.
NEXT STEPS
Here’s after only the first coat.
 After 3 coats (which took 3 full cans to do both awning top & underside + flower box), allowing for drying time in between, I was ready for the next step.
Most aged copper not only has that awesome bluish-green cast to it, but it also gets a dark mottling or splotchy marks. So, in order to achieve that look, I took dark gray paint and thinned it with a little water, then took an old t-shirt rag and dipped it in. I pounced all over and under the awning and window box, making it as random as possible, and darker in some places than others.


LAYERING
Once that coat dried, I dipped my gloved fingers back into the thinned gray paint and flicked splotches all over in a random manner. Tapping it lightly with a rag so the drops didn’t look round. That extra bit really gave it a true aging look.
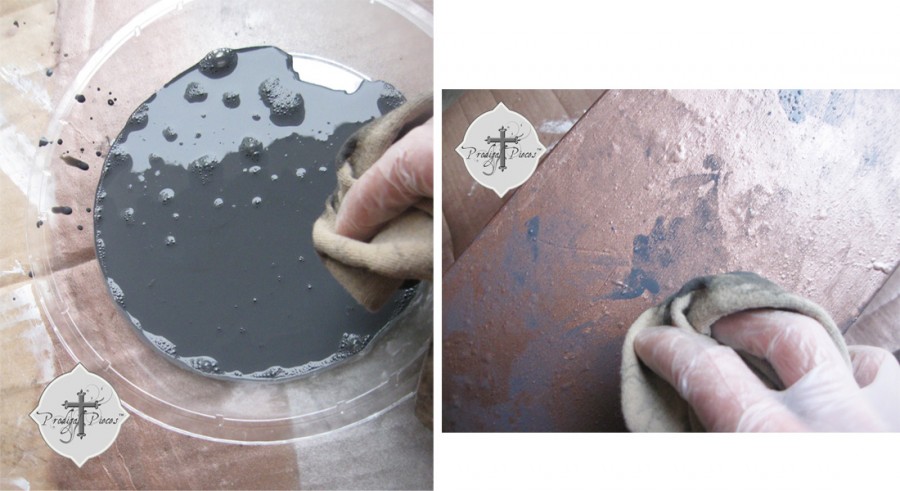 Once that coat dried, I dipped my gloved fingers back into the thinned gray paint and flicked splotches all over in a random manner. Tapping it lightly with a rag so the drops didn’t look round. That extra bit really gave it a true aging look.
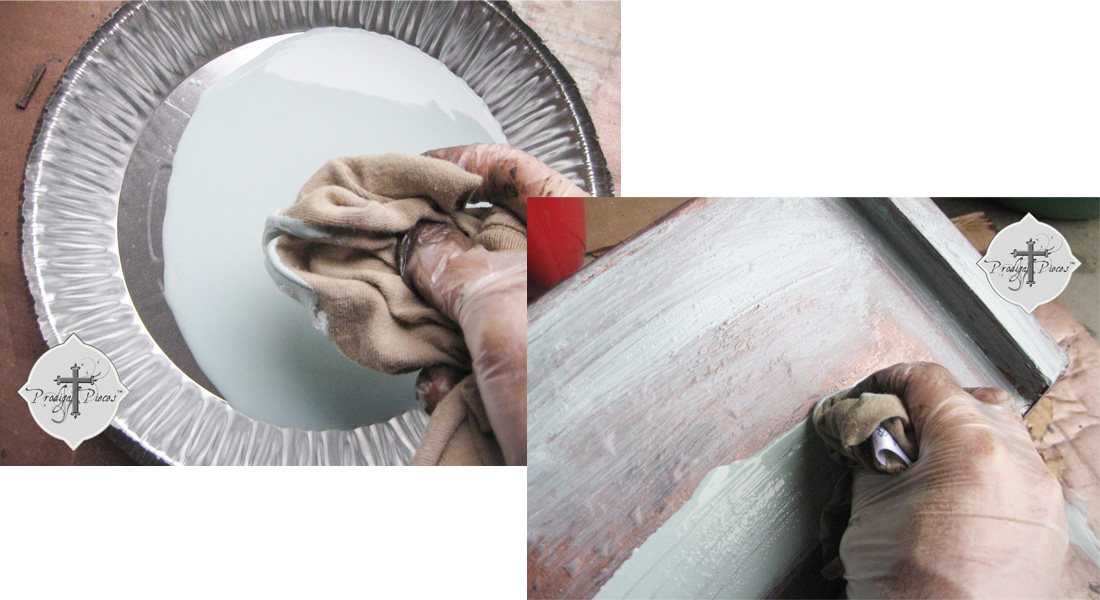
My end idea was to get an in-process copper aging, not a completely green color. In order to do that, I took a minty green paint and thinned it like the gray paint earlier. This time I did a glazing; wiping it all over and then wiping it off with a cotton cloth leaving a little behind here and there – all the while giving it a that luscious green color cast.

Just simply wipe it on with a generous amount, allowing it to fill in any nooks and crannies.

Then gently wipe off, leaving a washed layer behind.


THE REVEAL
 I like the effect the awning gives and it still serves as a functional part of our home.

 Our sweet little shed now is ready to be dressed up and the box adds that extra homey touch.


UP HIGH

Here’s a little ditty I sang to myself while up there: (didn’t know I sing while I work, did you? tsk.)
“Up on the housetop, Mama paints.
It’s all good until she faints.
Give her a hammer with lots of nails.
She’ll come down when the kiddies wail.”
{applause}
Share if you love this DIY aged copper patina tutorial!
Now onto our shutters and window boxes for the rest of the house. sigh. Maybe I’ll show you how to do that too…if you say pretty please. Give this finish a try…I know you’ll LOVE it!!
Before you go, be sure to sign up for my newsletter. Until next time!

Also, more makeovers like this DIY aged copper project for you:

Hi Larissa,
How clever of you to create the way to make a change without making it look brand new. I so agree with attention to the age of a home. I’m visiting you from The Dedicated House link and would enjoy having you drop by #9 to see me.
Thanks,
Helen
Hi Helen! Thanks for stopping by and your kind words. I’d love to stop by! :o)
Looks great, Larissa! The paint looks so authentic and goes great with the color of your house. 🙂
Thanks, Kelly! It’s fooled some neighbors so far, and I just finished our cupola… I think it looks good…makes the house gel.
What a great project! It turned out perfect. I will have to look for that spray the next time I am out. Thanx for partying at THT!
Thank you, Pamela! The paint is great stuff…my favorite is Oil Rubbed Bronze. I’ve used it on everything…my standing lamps, knobs, drawer pulls, etc.
That’s such a clever idea….love how you gave it new life too!
XO,
Christine
Yep, so rewarding to reclaim my own property and add that extra touch. Thanks, Christine! :o)
Wow!! I didn’t know they had this new color, buying some today, or soon. It turned out so awesome, and great tutorial. Thank you so much for sharing at Redoux!
Yep, it’s a great color and so versatile! Glad you liked it. :o)
LOVE the door color!! Can you please tell me what it is? I need to repaint my mustard-colored door, and yours is the exact shade I’ve been thinking of……..
Thank you, Julie! I actually custom mixed it myself with paint I had on hand…sorry!
Ummm, what brand/type paint did you use for your aging? (The grey and patina green/blue) You show the spray paint used, then do not mention the others at all.
It was what I had on hand and I did this over 3 years ago. It doesn’t really matter the shade since the effect will be the same. 🙂
Since this project is 3 yrs old. How is holding up now?
It’s actually 9 years old now, and I it is holding up wonderfully. You can see it in my updated patio pergola pics from last summer.