Our family consists of many members, and some of them just happen to have fur. We bring home our beloved furballs and want to give them the best. Because of that, I have created a pet bed that will surely let your cuddle bug know they are loved. Meet Teddy (aka Ted E. Bear).

We adopted Teddy when he was 1 ½ years old, since the previous owner had an illness that meant she could no longer care for him as needed. He as been such a loyal, lovable dog. He resides with us 24/7 and is our alarm-barking nut at 9 years of age. Teddy already has a cozy den that he sneaks into where he sleeps, but he is getting older. I wanted to create a snuggly pet bed where he can be with us all the time.

Once I built his bed, there was no coercing him to get into it.

He looks so content…I want one. hee hee hee.
DIY TIME
This is an easy build that can be done in a day with a few basic tools and supplies and is absolutely budget-friendly. You can build this for less than $30, including the cushion (see below for details). Not only is this affordable, but the best part is that it can be custom fit for any size cat or dog.

Before you cut
While this plan is suited to a small to medium size dog or cat, but it can easily be altered to suit your favorite pet cushion and pet size. In addition, this design was based on using two bed pillows inside a custom pillowcase. Feel free to alter the dimensions to suit any size pet bed. TERMS OF USE: If you want to create a pet bed using my design and plans, you agree to the following: it cannot be shared or distributed for monetary gain in any way, it may not be modified in any way, and you may not claim the work as your own.

Materials Required:
Tools Used:
- Kreg Pocket-Hole Jig
- drill
- jigsaw
- miter saw or similar
- sander
- builder’s square
- table saw
- tape measure
- DIY workbench (optional, but oh so fun)
Wood Products:
- 1 – ¾” thick quarter sheet plywood
- 1 – 1″ x 4″, 10′ board
- 1 – 1″ x 4″, 8′ board
- 1 – 2″ x 4″, 16″ board
Hardware/Supplies:
- 4 – felt furniture feet
- 42 – 1 ¼” wood screws
- 2 – trunk handles (optional)
Parts/Cut List:
- 1 – pet bed base: 30″ L x 24″ W
- 4 – bed posts: 8″ L x 1 ¾” W x 1 ½” D
- 3 – long side rails: 31 ½” L x 4″ W x 1″ D (diagram is incorrect below)
- 4 – short side rails: 24″ L x 4″ W x 1″ D
Cut bed parts
First, using the provided cut list and diagrams, cut the wood for your pet bed and sand smooth with a 120-150 grit sandpaper.

Trace and cut
Then take one of your 8″ corner posts and place the end flush to each corner with the 1 3/4″ face facing in and trace. Further, cut out corners with jigsaw.

Prepare bed base
Next, drill pocket screw holes on backside of bed base for 3/4″ material following the diagram. See next step for a tip.

Tip for pocket holes
Since the bed base corners need pocket screw holes that can be tricky, mount your Kreg jig to the corner of your worktable and rest the base as shown.

Mark side rails
Find center of your side rails, and then mark for a 3/4″ thick bed base lengthwise by measuring at 1 3/8″ and 2 1/8″ from a long edge and mark. Follow diagram.

Attach side rails
Attach your side rails using wood glue and 1 ¼” wood screws. As a matter of fact, by laying your bed base on the table and extending over the edge makes it easy to attach the rails. See photo.

Attach corner posts
Afterward, insert your 8″ posts into the corner openings so that they are flush to the bottom edge of the bottom rails. Attach using wood glue and wood screws in the corner pocket hole openings. Pre-drill holes through the side rails into the posts and attach with wood screws.

Attach top rails
Next, pre-drill holes into your top rails and attach flush to the top of your corner post with wood screws. Additionally, use a scrap 1″ x 4″ in between the top and bottom rails to help space the board while drilling and screwing. N0tice the 24″ rails are flush to the front posts, and the 31 ½” rail extends over the ends of the 24″ rails as shown.

Finish
Finally, it’s time to stain or paint your pet bed. Once dry, add felt furniture feet to protect your floor. Also, add a couple of trunk handles on the short sides for mobility and ease of cleaning. On the other hand, want to know how to create the cushion? Just head to the “Extras” tab to get the tutorial. Enjoy! Because your pet will love you for this treat. *note: the bed width is 31 ½”W, not 30″.


In addition, be sure to pin and share this so you can have it handy for future, and your friends will love you for sharing. ♥

Now, you’ve got your pet bed made and want to create a custom cushion, right?
Here’s how you do it (personal use only):
Materials
- 1 yard of 60″ wide fabric (or equivalent), PLUS 4 – 4″ x 15″ strips for ties.
- white thread
- 2 standard bed pillows
- fabric paint (optional) See tip below.
- masking tape (optional)
Tools:
- sewing machine
- iron / ironing board
- sewing pins
- sewing scissors
- round foam brush
- tape measure
For the purpose of cuteness and longevity, I use a cotton twill for my pillowcase, but you can use whatever fabric you choose. Also, this is the same pillow style I used for my bedroom, so this is a very versatile project.
However, before we get started, make sure to launder your fabric to get it prepped for use.
SEWING TIME
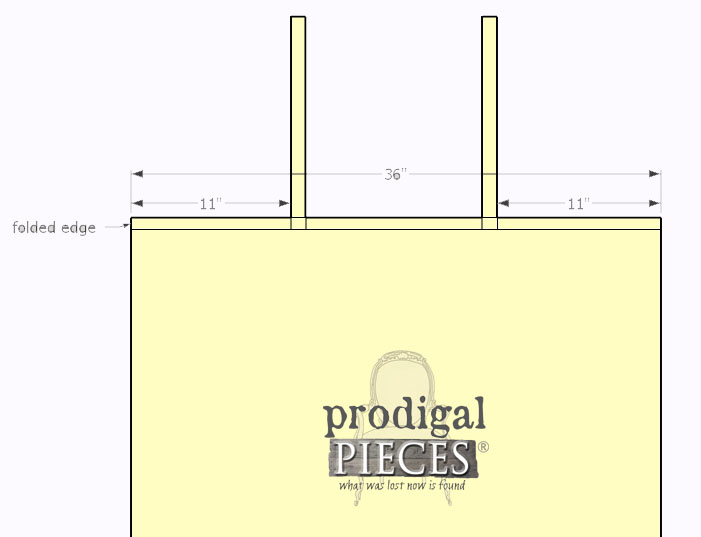
Once prepped, you are going to fold in your 36″ edges twice in 1″ intervals as shown below. Then iron down the folds to hold them in place. Lastly, pin and stitch down in a box format.

In the meantime, you are going to create your ties. (see diagram below for details) Fold a short edge down ½” and iron down. Then, fold each long edge in to the center and iron. Last, fold each folded long edge inward to center and iron. Pin to secure and stitch around open edges.

After you’ve created your ties, we are going to attach them to the pillow case. Line the unfinished edge with the bottom of the folded inside edge of the pillowcase and pin to secure. Also, do a box stitch to attach them to the pillow case.
Now, all you need to do is fold the bag in half with right sides facing, line up top edges, pin, and sew a ½” seam up the sides as shown.

Likewise, since you know I love rustic farmhouse, I used fabric paint (or acrylic paint with a textile medium added to make it washable), and masking tape to make faux grain sack stripes like I do on my furniture.
PET BED
Finally, stuff it with the two bed pillows and your pet bed is done!

Not only does Mr. Teddy love his new spot, but also we do too.

As a result, I hope you’ve enjoyed my latest creation. Likewise, I had a blast and am happy to share.
Before you go, be sure to sign up for my newsletter. Until next time!

While you’re at it, check out my other projects like my pet bed:


He’s so sweet, so is the bed!
He is a doll…just a loud barking doll at times. 😉 We love him. Thanks!
I haven’t seen a nicer pet bed ! Well built, a nice plump pillow, any fur baby would love. I don’t think Teddy will be sharing his bed ??.
Just wait until the cat sees it…hahaha… He will put up a fight! 😀
HI LARISSA..The PET BED IS THE BOMB…..just one suggestion turn the opening of the cover to the back of the bed it will look neater…..love love it.
Thank you! I don’t want to so I can see the ticking and it is a replica of the antique pillows.
You’re selling Teddy’s bed in your shop? Poor Teddy – where will he sleep?
Umm….I make them to sell.
Teddy is adorable, I have a real soft spot in my heart for older dogs and you can always tell when one has been well cared for and loved, loved, loved.
Speaking of love gosh I love that bed I can just picture my little fella in that bed, unfortunately he thinks he belongs in my lap at all times, (one good guess where he is now) he was emotionally abused the first five years of his life and I just don’t have the heart to put him down. I have only had him a year and I think he is pretty secure now and has forgotten a lot. He does sleep in a bed by my side of the bed at night so I have no doubt he would sleep in that beautiful bed at night, I will check it out at your etsy shop for sur. Another great job and I’m like you I like the ticking from the pillow showing.
I love the dog bed, I’ll need to make Mack’s for bigger he weighs 130lbs
Thank you
Love the bed and bedding! Question about the stuffed doggy toy, where did you purchase it? thanks
Thank you, Judy! The dog toy holds an old water bottle inside so the dog can crunch on it. We found it at WalMart. He LOVES it! (notice the missing ear. 🙂 )
Thanks for the reply and no I didn’t notice the missing ear. lol
hee hee hee.
This turned out amazing!! I think I might have to make one for our Matilda before our winter sets in!! Thank you for sharing the tutorial ?
You are so sweet to say so, Sam. Thank you! I know she will love it!
I am OBSESSED with the way this turned out. Takes elements from all my favourite cat beds and then puts them together into one gorgeous piece! Such a great job and I think my favourite cat bed of all the ones I’ve looked at today (and believe me that’s a lot!!). Lovely!!!
Awesome to hear! Thank you for the love. 🙂
Hi, I want to make this bed for my little shih tzu. can you please tell me how to change the measurements to fit her mat?
Sure! Can you email me the dimensions of her mat? You can use the contact form at the top of my page or use larissa at prodigalpieces dot com.
Crate. Where can I find empty new one ?
This is build plans only. 🙂
Ok, I will try one myself
Sounds like fun! 😀
Hello this is a beautiful pet bed. I love it so much but while reviewing the cut list it mentions 8 legs and I didn’t see anywhere in the instructions about using 8 legs. So my question would be is this a typo?
Thanks in advance
Michele
Thank you, Michele. I believe it was a typo. Thank you for catching that. Funny though… many have built it and no one said anything about it. haha. oops.