Today’s the day!! I’ve been telling you that I was working hard to not only get some major steps done in my kitchen remodel but also create a video tutorial so you can do it too. {{applause}} I’m all about brick – old brick, new brick, brick on the walls, brick on the floors…I love it! So, without further ado, here is my DIY faux brick tutorial and an update to my kitchen.
 brick and spend half the money. Easy video tutorial by Larissa of Prodigal Pieces | prodigalpieces.com")
You are not going to believe how EASY this is. Seriously. When you take over 2 years to remodel your kitchen, laundry, and dining, and you’re like me, you tend to…ummm…keep adding to the project. ahem. Did we plan to cut open our doorway in the beginning? NO.
Though we had planned brick, just not taking a saw to our wall. haha. However, what fun is that if we don’t do what we want while we’re up to our eyeballs in a hot mess anyway? Here is our tiny doorway in the before. Never mind the clutter and junk everywhere, k? Our living room is on our remodel hit list, but until then is a storage container. I’m so ready to have my house back.

After many years of knocking my knuckles on the door frame while carrying my laundry basket or trying to squeeze a piece of furniture I need to stage through there brought me to the conclusion that it was time to break out the saw. Truth be told that JC didn’t want to do it. He didn’t think that there is a need for change. But that’s him in everything.
THE BEFORE
Here’s the view from the other side looking in. See how small it is? We use circular saw and had at it. At this point I’m screaming, “YAHOOOOO!!”


TRUTH BE TOLD
One of the benefits of living in a home with wood walls is that we can cut and have at it like nobody’s business. Drywall doesn’t afford you such easy steps for sure, but it can be done just the same. Once he got the side opened up, we traced our arch onto the top and broke out the Sawzall. That was a gift to self in the first year I earned a paycheck from YouTube. Woot! Remember my motto: #toolsoverjewels!! Oh, and notice the cutie standing by…always in a leotard to be ready to dance. That’s my girl!

Saw dust settles and JC realizes I am right. I’m doing a happy dance at how easy that was AND that JC actually did it and I didn’t have to. (cause you know I would have if he didn’t) haha.

DIY TIME
Now for the fun part. I have been adding this brick paneling in our laundry around my ducting to make a faux chimney look. You can get these sheets at your local home improvement store for about $25 for a 4′ x 8′ sheet. Here it is unfinished. It is currently finished like the other brick but wanted to show you it in the “before”.

In my oven cleaning tutorial, I showed you that we custom built a cabinet for our new double-oven and then added brick to it.

Here it is in the rough while I was working on it.


It’s so easy that even my kids were helping me. Oh, and notice yet another leotard so at a moment’s notice she can break out and dance. I love it.

MORE DIY
Once done with that, I continued behind our refrigerator. Why? Because I’m one of those that believes you should complete a job right. Will anyone see it? Maybe. Maybe not. But…I know it’s done and our half-wit house, as I like to call it, is not half-wit anymore. tee hee.

MORE BRICK
The brick continues under the cabinets and around the door where it will meet our new tile in the corner.


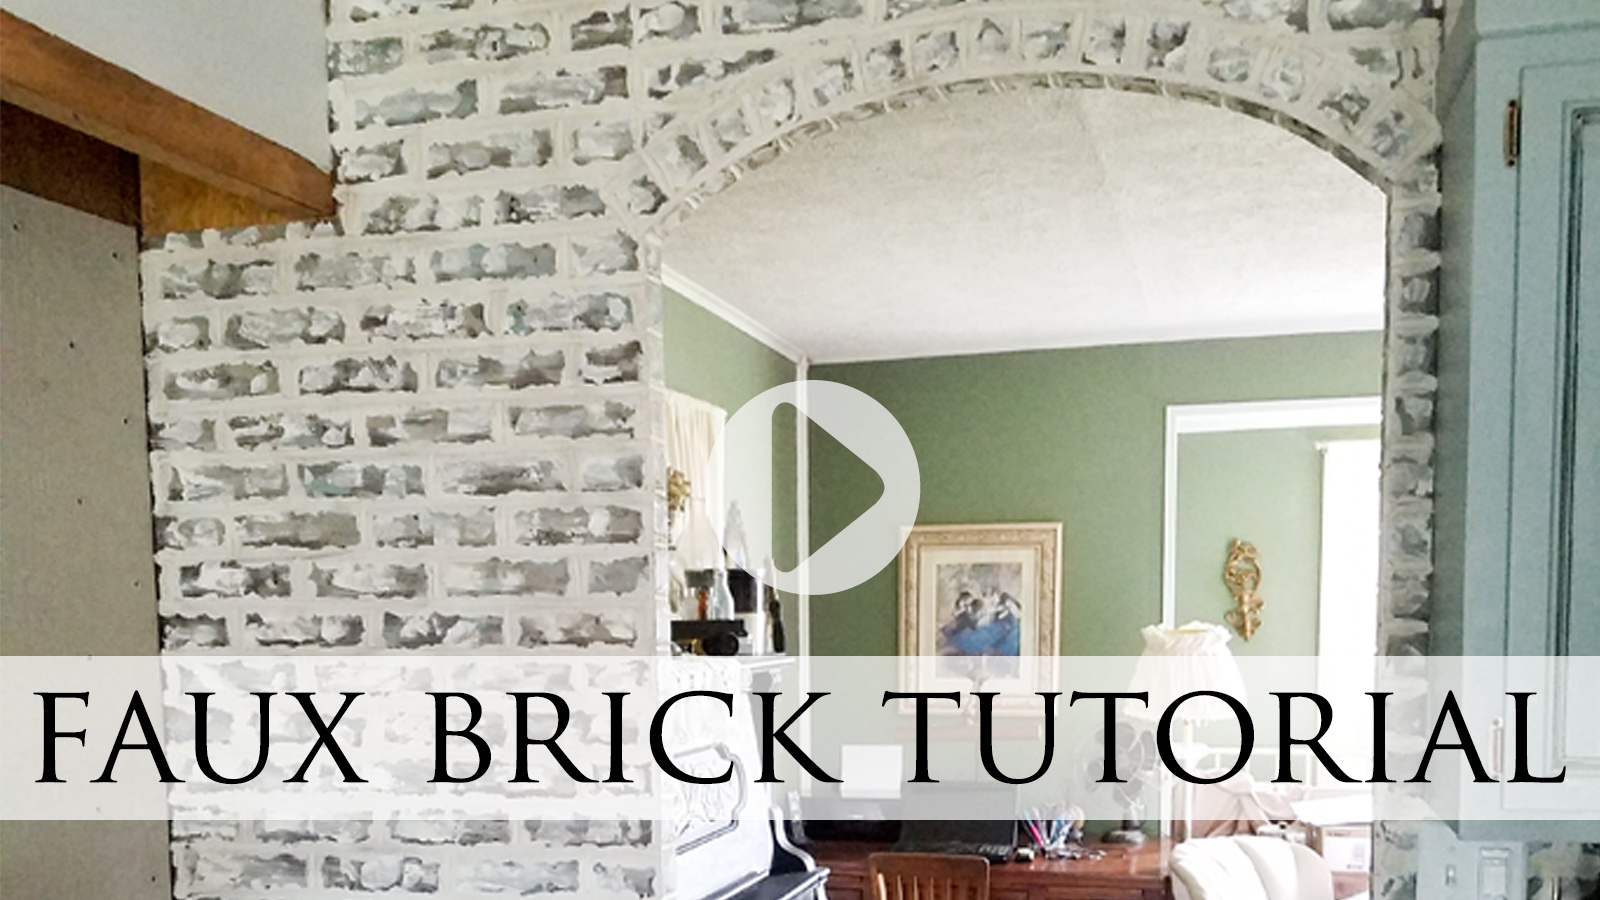
Here’s the doorway in the rough waiting for the DIY faux brick whitewashed look I’m showing you today. I’ve cut the panels with a jigsaw. I cut all the small brick pieces with the jigsaw as well. I then attach it all with a heavy-duty paneling adhesive and stuck them on using the nailer. So much easier than putting up brick AND if we ever want to change it out, I just pop the paneling off.
THE NEXT STEPS
So, are you ready to see how easy this is? I’ve got the full video for you below. And for those that can’t make use of the video, I have the full tutorial written out below as well.
Okay, so you want to give this a try? Here’s what you’ll need:
Materials
- brick paneling
- paneling adhesive
- aqua blue, soft white, gray, tan or your color choices
- brown wax or your color choice
- topping joint compound
- pre-mixed sanded grout – Alabaster or your color choice
Tools
- jigsaw
- table saw or circular saw with Rip-Cut edge guide
- nailer
- ½ brick jointer
- utility knife
- carpenter’s square
- tape measure
- paint brushes
- spray bottle
- rags
- couple of empty cans
Step 1
Let’s get started! First, you can pick any color you like as they have oodles of choices to match your decor. These are fantastic neutrals that go well most anywhere. The best part is you can practice on scrap before giving it a go on your wall. I actually suggest you do this to get a feel for the technique.
First, begin by prepping your floor or any other areas with dropcloths, etc. Pick one of your colors to start with and apply it quickly to about 5 sections of brick in a completely random manner. You want to work in small sections so that paint stays moist for blending. If you notice, I brushed it out in my pictures, and in my video kinda blobbed it on. Either way works fine.

Step 2
Next, work your way through each color until you’ve applied them all.

Step 3
Once all the paint colors have been applied, grab your rag and begin to blend the colors wiping side to side horizontally. Don’t worry about getting it in the grout lines because they will be covered up. If you feel the paint is drying too quickly, use your spray bottle and lightly mist before blending.

After I finish a section, I go on to the next section and do all the paint I want to do at that time. Then, I move onto the next step.
Step 4
Now it’s time to grab your topping joint compound and your putty knife for this DIY faux brick effect. Get a small bead of compound on your putty knife and smear a bit of compound working horizontally in random spots – like doing a skim-coat of each brick.

After the compound is applied, take a rag, even the one you just used for paint, and pounce it to create a stippled effect (or bumps). We’re looking to create texture, so have at it and have fun. After you’re done, let the compound cure for about 20-30 minutes. When you clean up the compound tools, make sure to do so outside as you don’t want to plug up your pipes with it inside. Same goes for the next step.
Step 5
Your compound is cured (hard to the touch) and we’re ready to get messy. haha! This is where you will need to allow the most time since the first steps go so fast. You’ll need your grout, a medium empty can or container, and the same putty knife you just used.
Place a grapefruit sized amount of grout in your container and close up the tub of grout to prevent it from drying out. Working in small batches again as you did with the paint, swipe across the grout lines (swipe vertically across horizontal lines, and horizontally across vertical lines), filling each line wiping excess off as you go. I like to hold my can of grout underneath my hand as I work to catch the excess and have less waste.

As soon as you’ve wiped in the last bit in the area you are working in, grab your brick jointer. Use the ½ end and begin to press and slide down each vertical brick joint. Do those first and then press and slide across each horizontal grout line.

Repeat this process until your entire brick area has had grout applied. Let cure for about 30 minutes to and hour or longer until cured.
Step 6
You can stop at the last step if you like the look of the grout as-is, or if you’re like me I like even more texture, so I add a hint of color. In addition, I chose to use a brown wax, but there are other colors too.
My goal is to highlight all the nooks and crannies and warm up the colors a bit to create an earthy feel. To get the look, I place a small amount of wax in a separate container to keep from getting the sand in my can of wax. Then, I use my old paint brush and lightly pick up a bit of wax and brush it across the grout lines and brick to catch the raised parts creating definition.
Here is a side-by-side comparison of with the wax and without:

Either way, it’s fun to experiment and give this DIY faux brick treatment a try.

WRAP-UP
Feel free to ask any questions as I am happy to help. What’s next for us is waiting for the local wood shop to drill holes for us to mount our reclaimed open shelving on the adjoining wall. While waiting, we are hanging our tile and building our custom range hood. I’ve had parts for that hood from an old house for several years just waiting for their new purpose. I can’t wait!
SEE THE FULL KITCHEN REVEAL HERE
Last, do pin and share this DIY faux brick video tutorial to inspire others to give DIY a try and make their house their home. It doesn’t have to break the bank and it’s FUN!!

Up next I will be giving this thrifted find a makeover. See the after in this post HERE.

Before you go, be sure to sign up for my FREE newsletter. Until next time!

Also, more projects like this DIY faux brick tutorial:


Larissa, your brick wall looks great. It really fits with your kitchen. I see you put brick on the inside of the arch but what did you do to the other side?
I think I would use the Dixie Bell paints to make some signs. 🙂
When we remodel the other room, we will either trim in brick or are creating custom woodwork.
That wall looks amazing, I need a back splash in my kitchen and this gives me more options.
I’m so happy to hear it, Robin. 😀
Agree!
Looks great! Hard to believe it’sbrick paneling & not real brick
Thanks, Karen! We are so pleased with it.
Beautifully done and a great way to get the look your’re going for but in a less permanent way!
Yes! Being that I like to change it up so much. haha.
Great job
Thanks
It looks great!
Thank you.
It’s beautiful Larissa. Question, how did you get the look of a full brick on the underside and facade of the arch?
Thank you, Kim. I just cut long strips for up to the arch on each side, and one small strip to trim the arch. Then, a small strip for the arch – this stuff is flexible.
It’s coming along so well!
I’m trying to be patient. 😉
Looks really good. I would use the paint to paint my dining room chairs.
Thank you.
I have an end table I’d like to paint.
sweet.
Beautiful… as always…. y’all are so creative! I’ve pinned it for later.
Happy to hear it. Thanks!
Not only does it look great but it’s awesome to see every one pitching in to help.
We have the best team!
What a fun project.
It sure is.
Nice Work!
Thanks!
Never heard of a remodel that was ever finished! Always a work in progress with updates! Looking great Larissa!
Just like owning the Golden Gate Bridge. 🙂
It isn’t just remodels. We built our house fifty years ago and I have learned that from the first dime you spend on a house you never own the house, it owns you. You are correct, it is a constant, never ending, process. And, then you start over again.
You are so right!
Looks amazing! Love it. I have a bookshelf I have wanted to paint for years. Hopefully by next week weather permitting.
Happy to hear it!
Great job! I would use the paint on something small like a shelf or picture frame. Thanks for the chance to win this awesome giveaway!
Thanks! Sounds like fun.
Love love love it! Brick is one of my favorites, as well. I would paint my dining table & chairs. Thanks!
Mine too! Sounds like a plan. 😀
Just wondering the history of your house with wood walls? I remember my grandparents’ cabin had wood walls too. You are putting a lot of love into your renovation! I would use the paints to redo a nightstand for my guest room. Have had it in my garage for a year and it needs to get finished!
It’s a Gunnison home built back in 1950’s for soldiers returning home. My whole neighborhood is full of them. Nice homes that were affordable.
Brick work looks great! I’d like to paint my large office desk.
Thanks! Sounds like a good one. 🙂
I love a project that comes out just the way I wanted. And that looks so easy! Very nice.
You and me both! Thank you.
Would love to try it….!
It’s super easy…really! Hope you give it a try.
I have been contemplating using these “brick” panels and like you I don’t plan to leave them as-is.
Sweet! When JC was checking out with the panel wondering about my idea, a lady came up to him and said emphatically, “WHERE did you get that??”. He was beaming when he came out of the store. haha!!
That day when the kitchen is all done, you make a meal, sit down at the table and gaze upon the results is THE BEST day! Soon!!
Yes! And then my gaze goes to the family room screaming at me to remove the beyond disgusting berber carpet and repair the roof leaks and dropping ceiling. haha!! never-ending. 😉 Thanks for the love!
What lovely texture and color this has created. Looks great!
Thank you, Rhonda. We all love it. 😀
AMAZING! Looks beautiful!!!
You just made my day! Thank you!
That looks AMAZING!
Yahoo!! I”m delighted to hear it. We think so too. 😉
I love it! You are such an inspiration!
Brandi, you’re the best! Thank you so much for the smile. 😀
Absolutely gorgeous, looks so real. I want to do this same thing in my new kitchen
Super fun to do and see quick results. I think I’m brick addicted!
Great Idea! Thank you 🙂
You bet! 😉
I applaud your creativity!
You’re so sweet!
Looks beautiful! Amazing job!!
Thanks! We are delighted with it.
I could use some Dixie Belle on the 12 Vintage Jewelry Boxes I’m working on! Love ALL your projects nd creativity so much!
Wow! You go girl!
Congratulations! It looks like you’re nearing the finish line.
So close! I’m not holding my breath though. haha!
Absolutely beautiful!!!! I have 2 dressers that need to be painted
Thanks!!
Great job! Looks like its always been there. Can’t wait to see your whole kitchen reveal. I know how it is when your house is in long term remodel, it took about 1 1/2 years to do our master bed/bath remodel,lol! Must of added at least a dozen changes ?
Yay! Thanks for the compliment! You sound just like me. haha!
Looks wonderful!! Hopefully whenthe weather warms up I will get my kitchen cabinets done!
Thanks so much, Stacy. 😀
I love your brick wall, turned out beautiful! I am painting a chair and reupholstering too. I need Dixie Belle in Drop Cloth!
We love it too. Thanks! That’s one of my faves!
You know I always love to see what your creative mind is up to next! This turned out fantastic, thank you for sharing Larissa.??
Teri, you’re the best!!
You inspired me to start chalk painting and use Dixie Belle Paint.
Wonderful! That makes me smile that you’re willing to try. It’s what it’s all about. 😀
Wow! What a huge difference to the look of your space! I absolutely love it! You guys did a fabulous job 🙂 I might just have to find something to try that on!
haha…you go girl! Thank you for saying so.
I love the look of the brick!
I would paint my kitchen cabinets with Dixie Belle Paint.
I’m slightly addicted. tee hee!
Looks so amazing!
Thanks, Lisa!
Love this and LOVE DIXIE BELLE PAINT!!!
Yahoo!!!
Wonderful job as always just love
Thank you for the hug, Christina. 🙂
So creative. Im always in awe of how a creative mind work. Great job.
This was so fun to share and do. Thank you!
OMG! Love it
Yay! I’m so happy to hear it.
I thought this application of the brick boards and painting them to look old school was genius.
It is something that is totally reproducible.
Fantastic! Thanks so much. It was a long time coming as I’ve been scheming for the two years. haha!
So creative! I just used Dixie Bell to rescue an old farm table and love it. My kitchen cupboards are next! Thanks for the inspiration!
Awesome! Their products do such wonders indeed.
Since I am not a real experienced painter of anything but walls, I think I would start with a small piece of furniture with the Dixie Bell paint.
I do love the look of your brick wall. I’d like to try doing something with that look. Thanks for the tutorial.
Sounds like a game plan. 😀
Larissa, your kitchen is really looking good with this arched and bricked wall! All the long hours and hard work you guys are putting into the remodel are truly paying off!! Well done guys!!!
High five, Kaycee!!
Good work ! One person’s “mess” is another person’s “creative process” !!!!!! I’ve been there many times before & will be there again. No, wait… I’m still there !!! 🙂
I am always in it…always. tee hee hee!!
Easy you say? Maybe for you who is so obviously creatively gifted but for us less fortunate (me) it would be a disaster. But I am just happy to enjoy your talent. Thanks for sharing it looks awesome.
Not at all. This couldn’t be any easier. All you have to do is try! 😉
You always work magic, I’m impressed!
Thanks, Malinda!
Your bricks looks incredible! Darn near real,I really can’t quite believe it. You did a fantastic job & explained the process so well. One question. When you were using the grout tool you mentioned in the written form ( not watched video as it’s late & House is quiet & want to keep it that way), to swipe or rub the grout vertical & vertical first! Which is it please? We built our home 18 years ago & have been under a major remodeling for the past two years. You will not believe this but I’ve had my eye on this brick in. Lighter shade to refinish by basement rec room to match the fireplace (hearth room) etc, it would look fabulous down there. I love what you did with it in you kitchen we just re-finished & took out & replaced lol the old granite (recycled of course into cutting boards & another bathroom) & refinished our hardwood floors & I stripped, sanded & re-stained my solid wood cabinets it’s breath taking.
Oops! One tired mama here. 😉 I changed the text above, but first vertical, then horizontal. The video is the best to get the details. 😉 Sounds like you’re a rockin’ DIYer!
Yours is the prettiest faux brick I’ve seen !!! Can’t wait to try it. I just got a small jar of that paint in the duck blue but haven’t had a chance to try it out yet. I’d love to win another color, I’m always painting something…thanks!
aww…thanks! I’m so happy that we gave it a try and did a little extra. You and me both!
I had this paneling up in my house when we moved here, I whitewashed it since it was so dark. Finally took it down about 2 years ago. I liked it but it was time for a change. I love painting anything, I have some wood stools that need an update so I think that would be the first to get painted if I won.
Fun! That’s why I went with this in case me or the next owner wants to change it up without much fuss. Couldn’t be easier. 🙂
Love it! I’m trying to think of a place/wall in my house that would look good brick.
Worth a try! Have fun, Rebecca. 🙂
Always awesome information. Love it!
Thanks so much, Mike.
Your kitchen is going to be some kind of awesomeness!
I love your exuberance!! Thank you!
Ahh, love your blog so much! Thanks for sharing!
Thanks so much, Tiffany!
I was so excited to see that you have some kitchen progress!!! Yay! Two years of living with a torn up and shuffled around house… wow. We just did that all last summer, and one summer was ENOUGH for me! You are going to be SOOOO relived to get this one done, haha! Lovely brick walls!
I have a growing “To Paint” list. Walls, furniture… 9 kids WILLl wear a place out, haha!!!
You ain’t kiddin. We took last summer to work on our outdoor projects, but still did some kitchen work. Still…too long. I need my home back soon! 😀
Have an old cedar wardrobe that needs some TLC & paint too!!!
Fun!
Love the faux brick!! First thing I would paint is a small boring armoire that’s in my bedroom. It needs a facelift!
Sweet!
I absolutely LOVE the curvature over the doorway!! My favorite paint is DB dropcloth.
I had to do something to spice it up. woot!
I love the brick! Thanks for the giveaway!
You bet!
Larissa! You never cease to amaze me! What a cool idea. Now you have me thinking that I NEED that in my kitchen too! Finally getting my table done, and it’s on to the bedroom! I would use the paint for a vanity that will be in there.
haha! I have had that need for 2 years and finally seeing it makes me sigh relief. Glad you like it too!
I love the look of this ‘painted’ brick, and the archway brick makes it look even more authentic! I agree with you to do the entire wall behind the refrigerator, and am curious if you tile all the way to the walls under your cabinets.
thanks for the video too, it really encourages me (more than photos) that I could do this!
Neat idea. I also love your countertops. We are debating whether to change up ours…hubby suggested granite. However, I love the look of butcher block–looks warmer to me. Can you give me any suggestions and info on upkeep. How do they hold up?
Thanks. Upkeep is not a problem at all, just depends on how you want to handle it. Some use a lacquer like we did, other treat monthly with an oil. All add charm and character.
Love this treatment! I can’t wait to see the kitchen reveal!
You and me both! 😀
Beautiful outcome! You and your husband make it look easy!
It seriously was so easy. You gotta try it! 😀
So pretty! Remember that old Z-brick that was popular back in the 70″s? It was faux brick that was cemented onto walls. It seemed every home I owned for my early years had it and I hated it and always painted over that ugly “red”. Now looking back with the new design trends I wonder if those homes still have my painted Z-brick!
Yes!! I like that these come of easier if I care to change and are so easy to hang. They just may still have it!
Beautiful Transformation with the brick! Such a nice update to the kitchen ? I haven’t used Dixie Belle Paint before buy would love to! I’d be using it for furniture refinishing.
You will love it, I have no doubt. 🙂
Very clever use of the faux brick. Takes it to a whole new level and makes it look authentic. Good job.
I would use some Dixie Belle paint to paint a kind of wonky lamp my husband made in high school back in the 40’s. Yes, he is that old, but still very much on top of his game. Any way, I am updating the décor in the guest bedroom that my grandsons usually use and I have decided that if I paint the lamp (red) and do a map shade, that it will be fun for them to know that Grandpa made it, even if it is a wee bit crooked.
Thanks for the compliment. 😀 Your husband’s lamp sounds awesome. Your grands with love it!
Such a creative idea! I love how you opened up that wall and the faux brick looks great!
We love how more light comes in and the way it now connects with the other room. Yay!
Love it as always!
Thank you, Terri!
I’d paint a small stand I have been waiting to redo.
Fun!
I’m loving that look y’all must be ecstatic!!! Nothing is safe if I have Dixie Belle paint ?
More like HALLELUJAH we’re almost done. Whew!
I have the perfect place to do this to, can not wait to try this. Thank you for a great tutorial.
My absolute pleasure, Wendy!
Love it. I would paint some night stands
Sounds good!
I love this look and had thought of doing this in my laundry room! Thanks for the inspiration!
Yay! We love the addition of it in our laundry around our ducting. Even laundry can look good too!
That’s a great idea and turned out awesome!! I think I would paint my front door and DB paint would jazz it up great!!!?
It will be sweet, Mindy. 😉
Omgosh! Larissa~This looks amazing! And you make it looks so easy even for me, lol! I have the perfect wall I’d love to do this on, an accent wall in my dining room! Thanks for the inspiration and sharing your talent!
You can do it!! I know you can. Thank you for the love, Candy.
Love the faux brick!! I would love to repaint an old desk for my craft room with dixie belle!
Awesome! You will love it!
Loved the makeover!! We have some bookshelves that I’d love to give a new look!
Thanks! That sounds like a sweet project.
Thanks for the chance!
My pleasure!
Wow, your faux brick wall turned out beautifully! It does require quite a bit of painting, though. I don’t know if I’d have the patience! But it sure does look nice.
The whole wall took less than 15 minutes to paint, so it’s really fast. The compound takes even less, but as i mentioned the grout is by far the time consuming part. Overall, it’s far superior in time consumption that hanging actual brick. As me how I know…hahaha… 🙂
O my goodness. How gorgeous!! That was absolutely beautiful. I would love to do this over our fire place!
Oooh…that would be wonderful!
Wow,what a makeover. I love the faux brick.
Thank you, Mechele. 🙂
PS Can’t get to the tea cart on the entry roster. ??? Any ideas why?
Hmmm…not sure. :/
So many things to paint, not sure where I’d start. Picked up an ottoman with great legs, just needs new upholstery and a paint makeover. Or I might give a big chunky candlestick a new life.
I have one of those too that I’m holding in my stash until our remodel is done. Woot!
Wow Larissa, that really does look like the real thing! Awesome tutorial too!
It really does and feels like it to. We’re happy to have it done.
What a great DYI. Would you keep us posted on how this washes up? I must be a messy cook, but I have to wash up my backsplash every few days…also…when c an we see a post on the overall kitchen make over…I am waiting on bated breath here in SW Michigan. Also you seem to be heading more towards blue’s tones- will you be re painting your dark green walls in the adjoining room? (I had cream/orange/deep blue 27 years in my Cape Cod home (you have to realize this was the 1970’s and orange was BIG!)in the city and now after 17 years of green/rust/brown/gold in my country ranch style home,, I am REALLY missing my blues!!
Thanks, Donna! Since this is not behind my sink, I get very little kick up on it, so it’s really easy. Because this is an MDF product, I wouldn’t use it in areas with high water use. We are putting tile behind our sink. Yes, the living room is on our to-do list after our family room. I love the soothing blues. 😀
This faux brick is absolutely awesome!!! Definitely going to be my next project in my kitchen! Thanks for the inspiration!
You just made my day! We love it too. I’d love to see a pic when you’re done!
Larissa,
I just love this faux brick! We are buying a little home in FL when my hubsy retires next month and I want to build a breakfast bar & use brick on the base…and I’m definitely going to give this a try. Fun to watch you transform these projects…would love to have a girls days of DIY! Come on down to Florida! 😉
Blessings to you and yours~
Cricket
How exciting for you!! I would love to see what you do with it. 😀
Looks nice but too many steps. I’m putting the faux brick on 2 walls in the kitchen but I’m going to use the german schmear method. Much easier and it gives you a lot of texture and hides seams.
Only too many steps if you don’t want to use them. I mentioned that you can do it in any fashion you prefer. I wanted color instead of the Schmear and I wanted the seams to show. 🙂
Did you seal the kitchen backsplash?
We did seal the grout on our tile.
This looks amazing. Do you have any pictures on how you did the arch? I have done flat walls and our new house has a couple arches. Thanks
Thank you, Rhonda. Do you mean the actual structure? We have wooden walls so we just cut into them because they aren’t load-bearing. However, different steps would be needed if you have drywall.