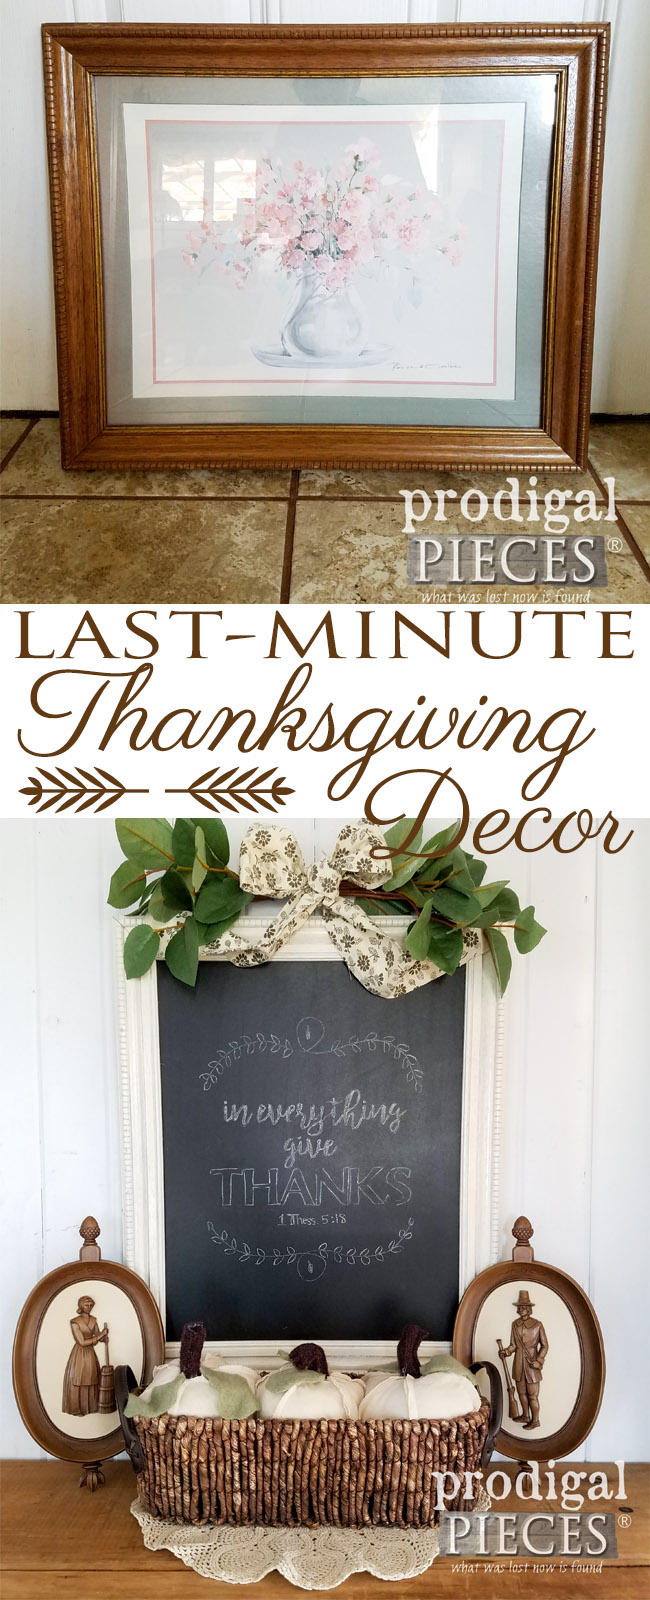
Have you ever been stuck in the position of having guests over for the holidays and you didn’t know they were coming until the last minute? {{raises hand}} Nothing like a quick panic to set you squirming not only to get your home clean but looking good too. I’m here to help! Grab that dusty old picture sitting in the garage and give it a whole new purpose. This project is all about budget-savvy fun for everyone. Let me show you how to create some last-minute Thanksgiving decor (or any day decor) using this thrifted wall art below.
*post sponsored by HomeRight (see full disclosure)
This project is super simple and will make a lovely part of your holiday decor. The best part is that it can be used for every day too when the holidays are over. Yay!
Everything in this vignette was either thrifted or handmade, so it is doable and, on a budget, as well. We all love those kinds of makeovers, right?
To get started, here is what you’ll need:
Materials:
- picture frame
- hardboard – found at home improvement stores in various sizes
- spray paint of choice color for frame
- chalk or chalk markers
Tools:
- small spray shelter
- turn table or lazy susan
- staple puller (optional)
- utility knife, hacksaw, or jigsaw
- mask or respirator
- point driver or heavy-duty stapler
If you’ve been around me for long, you fast learn I have a serious affinity for my tools. My motto has always been #toolsoverjewels since a teen and that still stands. Ever since this thing came out, I have been whipping it out to get my projects done quickly and save myself the “Sorry, JC, I hit your stuff with overspray again” stories. ahem.
Finally, no more boxes and sheets set up trying to make a go of spray painting. This spray shelter folds up into a bag and pops up at a minute’s notice. It even doubles as a lightbox for staging my small product photos. I love it! You see the oodles of projects I’ve created using it HERE.
Step 1
First, disassemble your picture frame by removing any unwanted artwork and the glass, if present. Set aside those parts for later. There are times you can reuse the glass for later like I showed how to turn basic glass into a mirror in this tutorial. So, why not hang onto it and swap it out as your whim suits you, right?
Also, you can use this inexpensive tool called a staple puller to make things easier. I talk about it all the time and it sure is handy. It helped me in my recent desk makeover and cedar chest redo.
Step 2
Next, pop open your small spray shelter and place your frame on an empty box or some other raised surface. I like to use a thrifted lazy susan covered in paper so that I can turn my frame easily. You can also get a turn table made for spray projects.
I use a scrap piece of wood to hold the frame and make turning a bit easier.
Step 3
Using your spray paint of choice and a mask or respirator, give it a nice even coat. Then, begin by staring to spray before you hit the frame and continue off of it. Let cure for about 30 minutes and give it a second coat, if desired. I used RustOleum Heirloom White in satin finish for my frame.
Step 4
While your spray paint is curing, it’s time to create the chalkboard part of our last-minute art. Take the artwork or glass you set aside and place it on your hardboard. Trace and then either cut/score the hardboard with a utility knife, hacksaw, or jigsaw to the size you need. I used a remnant piece of hardboard from a previous project, and it works fine.
You can find the hardboard in your home improvement store. It comes in small sheets and large. I prefer to buy the 4′ x 8′ sheets since I use it so often and is more bang for my buck. You can see my other chalkboard creations in these posts.
Step 5
Place your cut hardboard in the small spray shelter and give it a first coat of your flat black spray paint. Not only is there no need for the expensive “chalkboard” paints, but flat black paint works just as well. Let it cure and give it one or two more coats, allowing to cure in between.
Step 6
Next, take your chalk and rub it long side down all over your painted chalkboard. This primes the chalkboard for repeated use. Use a soft, dry cloth to wipe clean.
Step 7
After all pieces are cured, it’s time to reassemble. At first, put your frame face-down and insert your chalkboard painted side down into the frame. Secure with a point driver (as shown) or staples, glazier’s points, or small nails. You can cover the back with paper or fabric, or even leave it as-is. Totally up to you how to complete it.
Step 8
Since this is a versatile piece, you can create any art you want in a software program or grab a freebie off the internet. For our last-minute Thanksgiving decor, I’ve created this one for you.
–>>PRINT TRANSFER HERE <<–
 Step 9
Frist, to transfer any image to your chalkboard, simply print it onto basic office paper, and place it on window with image facing out. Then, trace and color over all the letters with a piece of chalk.
Step 10
Now take your chalk-coated transfer paper and place it where you want it on your chalkboard. Next, tape it down to keep it from shifting during transfer. Using a colored pencil, trace over the letters, outlining them (no need to press hard, lighter tracing works fine). This transfers the chalk design to your chalkboard.
Step 11
Remove your transfer carefully. To fill in the design, use a basic pencil sharpener to sharper your chalk. Again, no need for expensive pencils to get the job done. Likewise, fill in the the design as you see fit. To sharpen up the lines, you can use a cotton swab to wipe away and excess dust that may have shown. Last, if you like, you can even use craft paint to make this a permanent feature and paint it in as desired.
THE REVEAL
And, your last-minute Thanksgiving decor is done!
Now you have a beautiful piece to greet your guests and family, and you can even change it up for the next holiday…Christmas! Chalkboards are fun in most every room of the house and make for great gifts too. They really are easy to whip up using cast-off wall art as the base.
I’m enjoying my vintage pilgrim plaques I recently found. I was so stoked to find them in time for the holiday.
The thrifted basket looked like it needed some cuteness, so I made a few repurposed pumpkins out of felted sweaters and remnants to fill it up. In addition, you can’t see it, but I added a burlap sign to the other side. You can find this chalkboard (in case you’re not into DIY), the pumpkin basket, and other fun items in my online shop.
Pin and share this last-minute Thanksgiving decor tutorial as you just may help someone in a pinch. Thanks!
To get these DIY tips & tricks in your inbox, be sure to sign up for my newsletter. PLUS, you will get your FREE Furniture Buying Checklist and special discount to my shop. Until next time!





Love your tricks of the trade knowledge Laurissa!
My pleasure to share, Cindy. Thanks!
Thanks for sharing you wonderfully inspiring knowledge.
My pleasure.
I have been wanting to do a chalkboard for some time…this is great inspiration. You draw beautifully. 🙂
I’m happy to hear it! Thank you.
Lovely!
Thank you, Deb.
Love your picture frame project along with your tips and suggestions.
I have some old flower vases and candle sticks that could use a good makeover and this spray shelter sure would be handy.
Thank U 4 this giveaway opportunity
Wishing you and your family a Happy & Blessed Thanksgiving
Thanks and same to you, Colleen.
I have a small thrifted box with 9 cubbies that I put my
assorted flower mugs in. I could refresh it and give it a pop of color.
Thanks for your many tips.
Sounds good!
A great addition to your Thanksgiving decor. HomeRight tools are fantastic and that spray shelter would definitely make spray painting more efficient!
Thanks! I’m happy to offer them in my shop. 🙂 It sure does make life easier.
Such a pretty vignette, and great to know that it’s not necessary to but chalkboard paint to create a chalkboard! Thanks to you for sharing your know how — and more importantly, your tested faith– with all of us! I’d use that spray tent to help me spruce up hardware and thrifted furniture and decor for my 1930s vintage “new” home.
Happy Thanksgiving!
I’m all about thrifty and fun! Thanks so much, Theresa.
The spray shelter is awesome! What a great spray paint tool.
It has endless uses, really. I love it to take pictures too!
Thanks for showing th the mall spray shelter. I am a visual person and it helps to see it. My head is spinning thinking of all the times that would’ve helped me! Lovely project!
I know what you mean as I am the same. High five!
I have some chairs I’d like to paint!
Fun!
Love the makeover and the “how to make a mirror” link. Having trouble pinning, but maybe it’s my computer.
Would love a small spray tent – I have the “biggun”, but the “littlun” is so very practical!
Thanks so much!
Love your project! I was just eyeing some frames at the thrift shop. They had great prices but I was wondering what to do with them. Wishing you and your family a Happy Thanksgiving!
They are so handy for many things…I love it!
I love this! Thanks for sharing. Am anxious to get started upcycling things (when I retire :)) and the spray shelter is on my list for a first purchase!
You will have a blast…literally! 😀
I buy thrifted art all time! Reusing those frames is such a money saver. Thanks for the chalk board idea.
Atta girl! It’s fun to hunt them out too.
Love the tips and tricks here. I’m on the hunt at lunch hour for some of that hardboard. I hope I can find small sheets of it – not the 7ft sections that are showing online.
Try Home Depot in their upright bins. They have smaller sheets there, and sometimes even black board sheets too!
Everything you do is so pretty! Thanks for your chalkboard lettering tip! Love it! And those pilgrim plaques are awesome! What a cool find. ♡
Your words mean much, Staci. Thank you!
I just grabbed an old blackboard that our church was getting rid of. But it has no frame, so I’ll be on the lookout for something I can use for the outer edges of the chalkboard. Until then, I have some plant holders that need some spray paint love. Your shelter would be most welcome for this task! Thanks for offering, Larissa! Love those pumpkins!!
Score for you, Patty! Sounds like some DIY going on. 😉
Truly gracious and special
Thank you so much, Malinda. 🙂
I’ve been collecting (hoarding) thrifted frames all summer… I was planning on painting them with a brush. If I win this, things would be so much easier!
hahaha…love your terminology. 🙂
For some reason, I wasn’t able to pin the picture you wanted. The Pin symbol was hovering above the picture and it would disappear when I tried to click on it.
Just messaged my tech guy. Thanks!
I would probably work on a frame I have now that you’ve inspired me.
Sounds wonderful!
Such cute decorations! And a great tip about flat, black spray paint for chalkboards.
Thanks and you bet!
Love the makeover. I’d paint some candle sticks.
Those are so nice to make new. Fun!
Such a cute vignette. You have enlightened me to using flat black paint… I’ve always bought the expensive chalkboard paint cause I thought that’s what you had to use to make it work. Thanks for sharing and your inspiration!!
Yes! Any flat black work. I brush it on often too. Glad to hear you like it, Debra! 😀
I need that spray tent – there is some gold paint on the garage floor Whoops!!!! I am painting a frame today for a chalkboard
Looks like Smurfs exploded in mine! bwahahaha!!! Tent is a blessing for sure.
Love this makeover, I have a few frames in my stash that would work. I’ve been wanting both of the spray shelters for awhile, maybe Christmas ?
I hope you win and get BOTH! 😀
Such a cool technique Larissa and you don’t need those fancy machines! This is definitely my kind of project!
Wahoo! Thank you, Mary.
I had no idea that I didn’t have to buy the fancy chalkboard paint! Thank you so much! This project is so much fun. I want to make two, one just like this and one to hang on the stairway to my daughters room so that my girls can play tic tac toe.
Yes! Any flat paint is just the same. My littlest love tic tac toe!
You are so amazing! I have followed you for over 2 years…and love how detailed your explanations are! Love your projects and the hints of how to do each one. This is a wonderful chalkboard. I’m sure to try it! Blessings to you and your family this season.
You deserve a huge hug, Janice! Thank you so much. {{HUGS!!}}
I, too, have picture frames to refurbish. They have nicks and scrapes, and they could use a coat of new paint.
Yes, this one did too and was a great candidate. Fun!
That turned out great Larissa, love your projects!!
Thanks so much, Karen!
Ah ha! Black flat paint instead! I like to do colors for the chalkboard. I found some clear chalk paint to cover over regular paint, but am wondering…what if I used flat, say green, paint. Would it work also??
I had no idea that flat black spray paint works for chalk boards! Thank you so much for your tips and encouragement to try new things.
Yes! Any flat paint will work. So fun!
I have wanted one of these shelters for a LOOOOOOOONNNNGGGG time.
Hope you win, Christine!
Great project…I’ll be on the hunt for an interesting frame to recreate this idea. And oh, how I would love this paint shelter! It’s so awkward trying to paint small items, especially now that we’ve moved into our new home and haven’t had time to get everything set up & organized!
Yes, it makes all the difference. Hope you get settled soon, Joyce.
I have 2 large sized frames in that yellowy-honey-oak color. They would be my first projects to spray paint!
Sounds perfect!
I would spray paint a vintage Costco stool I got at a yard sale.
I love those!
Would have loved the spray shelter a few weeks ago when I painted a ho-hum lamp base that I had. Now it is the centerpiece of my newly refinished buffet. Love your creativity!
Hooray for you for giving it the DIY treatment. I bet it’s beautiful.
What a great repurpose, and I appreciate your “tricks and tips”. Thanks for the chance to win the spray tent too!
My pleasure to share. 🙂
Fun makeover! I love frames and have quite the collection! Would like to make a chalkboard out of a pretty silver one that I’ve had for a while (I’ve just been hanging the frame with nothing in it). I just bought a can of Rustoleum’s chalkboard spray paint. Now all I need is a spray tent!!! Love your vignette, very welcoming!
Sounds like a plan. 😀 Thank you for the love.
Didn’t know that about chalkboard, thought you had to use the chalkboard paint, thanks for the tip. Thanks for answering all my questions I send you even as busy as you are. Thanks for being such an inspiration to us all! Happy Thanksgiving Larissa…
Yes, so many are tricked into it. Any flat paint will do. Happy Thanksgiving!
What a sweet makeover Larissa! Count me in as another person who did not know about the black paint tip, thank you for sharing that and the opportunity to enter!
Thanks so much, Kaycee! Yes, I share often about any flat paint working the same. No need to spend big bucks!
I’ve got a frame already! This just might have to go on my Christmas list!
I wish I could give one to each of you. 🙂
I’d like to use this for spray painting some old candle holders.
That would be perfect.
Wow, that turned out amazing, who would have thought you could use regular flat black spray paint instead of the expensive chalk board paint, great tip. Thanks for having the contest to win spray shelter. I NEED that so badly, my husband also agrees, over spray stinks!!
hahahaha!! I hear that. 🙂
I could definitely use a spray shelter! I have a workshop so it would be perfect! LOVE those pilgrim plaques too!
It would be perfect for you, Sue.
I would use it on a couple of end tables that need painting.
Perfect.
What a wonderful idea of re-doing a picture that is of no value and having a chalk board. Love it. Sure could use a spray tent tight now as I am spraying pine cones with mirror paint.
Those have to be beautiful!!
I have several wooden pieces awaiting a makeover, not to mention all those frames I thrifted. ?. Love the chalkboard.
hee hee hee. I hear ya, Deb.
I would redo some clear glass vases I bought at the discount store.
Best things to find and redo. Have fun!
This would nake painting soo much easier! Thank you for sharing your knowledge and have a very blessed Thanksgiving!
Same to you!
I’ve been wanting your spray tent for a while now! So many projects on hold! You’re an inspiration!
I hope you win, Jodi!
We are remodeling an old house so are trying to reuse as many materials as possible for furniture and accents. I would use the spray tent for all the hardware, trim, frames, fixtures, etc. that I have so many ideas for!
Kudos to you! It makes the adventure all the more fun.