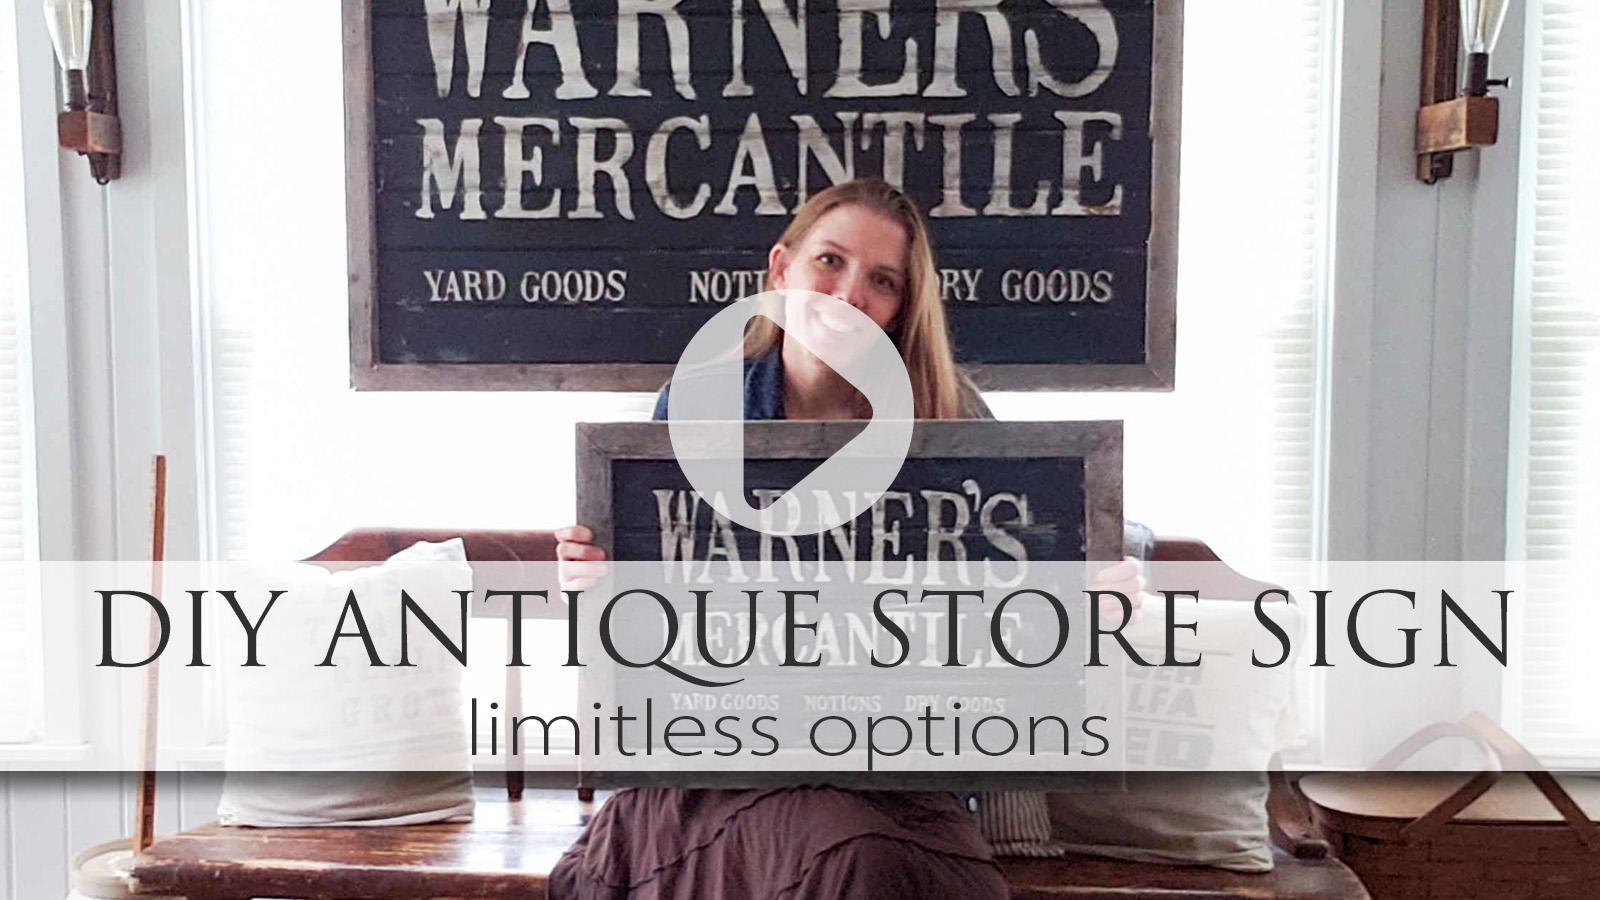
Today I can’t wait to share with you a fun new creation using this wood I dug out of the clearance bin. Would you believe I’m going to turn it into a DIY antique store sign? Let the fun begin!

If you don’t already, I seriously suggest you check out the misfit clearance bin at your local home improvement store. I get some of the best project wood there. These pine tongue & groove carisiding boards were a complete score for me because (1) I needed it to patch my family room ceiling in my redo seen HERE (2) they make for awesome planks for so many other projects.
DIY FUN
My goal today is to show you how those basic pine planks can be made to look like this…

Isn’t that fun? I even made video tutorial with a mini version so you can do it too. I know you can! The best part is that you can make this any size you want, in any color, with any text. The sky’s the limit with this…really!
Let’s get started with what you’ll need to create this DIY antique store sign:
Materials:
- tongue & groove pine carsiding planks – size is completely up to you. *note: most home improvement stores will cut the wood for you for free – just ask.
- stain of choice – I used Provincial
- paints of choice – I used 2 colors for layering, and milk paint for the topcoat.
- waxes, glazes, or topcoat if you like
- 1 5/8″ screws
- keyhole hangers – or other type of picture hanger of your choice.
- sheet protectors
- spray adhesive in medium tack
- repositionable spray adhesive
- sign design template of your choice
- wood for frame, if desired
Tools:
- paint brushes
- Kreg Pocket Hole Jig
- brad nailer
- 1″ brads
- drill
- extended driving bit
- miter saw or miter box (could also use circular saw or jigsaw, or table saw
- woodworking clamps
- sander or sandpaper
- scissors
- miscellaneous tools – hammer, screwdriver, wood scrap, etc.
- safety gear – safety glasses, ear plugs, dust mask
Now that you’ve got your essentials, let’s take a peek at my video. It shows all the basic steps, but I have some diagrams for you on assembly below.
Okay, now let’s go over the steps here so you can hear the nitty-gritty details to make your own DIY antique store sign. Feel free to ask questions below or via email.
TERMS OF USE: when you build these signs or any of my projects, you agree to the following: it cannot be shared or distributed for monetary gain in any way, it may not be modified in any way, and you may not claim the work as your own.
Step 1
I mentioned purchasing my wood from the seconds or clearance pile at a local home improvements store. If you like to craft, build, or DIY, that is a sweet spot to score good wood. For me, it’s kinda like the last stop on every visit before I check out. To get started, choose your dimensions and then add pocket hole joints to the back as shown in the video.

For a smaller sign, I used to joints at each end, while for the larger sign, here’s the layout:

At this point, you’ll also want to rip the tongue off of one of the planks if you intend to build a frame. Using your table saw is the easiest way, but it can also be done with a jigsaw or circular saw. We do this so that the top plank will butt up flush to your frame. If you’re going frame-less, you can skip this step and add slats to the back as mentioned in the video.
Step 2
There’s nothing more tell-tale of a good antique hack than time-worn wear. When done right, it really can be hard to tell. Time to break out some miscellaneous junk to have a blast creating a story on your wood. I used these bits to pound, mash, scrape, dent, etc. all over my boards as shown in the video.

Step 3
Apply your stain. I chose to use a dark stain, but feel free to use whatever color you prefer. To give a nice, finished look, I also stain the back side. Let cure and then we’re on to the next step.

Step 4
Time for paint! For my DIY antique store sign, I wanted a dark face with light letters, so I used an basic eggshell finish paint in a linen color. Consequently, feel free to use a dark color and have a light face. The options are endless with this sign.

Notice I don’t cover the entire surface, but be rather light with it making sure there’s enough coverage for the letters to have a surface to mount on. Let this layer cure and then you’re ready for the next step.
Step 5
Time to make our letters. As I mentioned in the video, you can totally use a stencil, or other means to get your graphic on your sign. My goal was to create layers, and also do this in an easy, affordable way so that anyone can do it.
I printed out my design on basic office paper to keep it simple. Now, take your sheet protector and cut off the bound side and open it up.

With the sheep protector laying flat, cut down the middle seam leaving two pieces to cover two pieces of your paper design.
Lightly spray a bit of your medium tack adhesive (the blue can) onto your design paper.

Beginning on one long side, apply the sheet protector evenly over the paper design you just spraying. Don’t worry to much about creases or bubbles at this point, just make sure your design is covered by the sheet protector.

Cut out your letters with scissors and set aside.
Step 6
Place your dry-fit boards together and grab your pile of letters and your repositionable spray adhesive. Above all, do a dry-fit of your design my laying it out on your boards to make sure you have it as you like the finished look to be.

Then, lightly spray the back of each letter with the low-tack adhesive (on the left). Place the letters on your boards making sure they’re level and adhered to the boards on all edges. Be sure to press them into the grooves as well to promote a good seal. *note: I chose to hand paint the smaller letters on using my transfer method, but you can cut those out and add them too if you prefer. Also, if your fingers get a little tacky from applying letters, just use a bit of rubbing alcohol on a rag to wipe them clean.
Step 7
Next, it’s time to add layers over your letters. Since my end product is a dark blue, I chose to use layering colors in the blue family with a custom teal color and a gray that has blue tint. As I showed in the video, there’s no exact science to this, just brushing on paint in blended layers.

Let the layers cure for about an hour and then you’re ready for the next step.
Step 8
Since we’re going for an lovely time-worn look, I chose to use milk paint on my top layer. It gives such a beautiful rustic finish, especially if you don’t mix it up evenly. Additionally, you can also get a similar effect with latex and school glue to create a crackle. However, milk paint is a bit simpler to work with, and I do adore the end result. This was my first time using Old Barn Milk Paint in Agate. It worked wonderfully.

This particular paint mixes up with 1 tablespoon of milk paint powder with 1 tablespoon water. For reference, I only needed 2 Tablespoons for my small sign and about 5 tablespoons for my large one. One pouch of milk paint goes a long way.
Brush on the milk paint being kinda sparse with it to let the other layers peek through, but be sure to make sure most of the edges of your letters are covered so you have definition in them at the end. Allow some spots to have thick paint so that you can get the crackle effect.
For a crackle, use your hairdryer to dry it quickly. The crackles will pop up instantly. It truly is a fun show! However, if you want to skip that part, let the milk paint cure for about 30 minutes to an hour.
Step 9
Almost done! Wahoo!! This is the fun part where you get to see your DIY antique store sign come to life. Time to peel off the letters to reveal your layers. My kids had a blast helping me pick them off. You may notice a bit of the adhesive remaining in the letters, but that’s okay. It will help add to your time-worn story.
Once you’ve removed all the letters you can add waxes and glazes, even distress with sandpaper for even more of an aged appeal. I chose to use a white and brown wax, plus distressing. The sky’s the limit with how you can finish it off. I like to use my putty knife to scrape off paint here and there.

Step 10
Last, but not least is time to add your frame, if that’s the option you’re going for. For my frame, I used my old garden stakes that are weathered pine that were once 2″x 4″s ripped down the middle. I’ve used them in several projects like my repurposed butcher block cart, and my louver door wall art. They sure come in handy!
The only downside to using them is they are typically warped and twisted so your cuts may be a little off. But, I feel that adds to the aged appeal in my sign and truly looks legit since an old frame would be warped and twisted too. Kinda like my brain…hahaha!
Of course, I realize not everyone is going to have weathered wood laying around, so feel free to make a frame how you like. However, keep in mind, you can use ripped 2″x 4″s and stain them with a weathered wood accelerator too. Also, see it in action on my treadle sewing machine table in this post.
If you’re not familiar with how to create a mitered frame, here’s a simple diagram to show you how to take measurements. You want to measure the outside of the sign corner-to-corner edges.

Set up your miter saw (or miter box) on the 45° angle. Cut your wood on opposing angles for each end. For example: cut one end on the 45° setting, then flip your wood to the opposing end, and also flip it to the other side. That will give you the right opposing angled cuts. Don’t forget to figure in blade width in your cuts too as the blade chews out about an eighth of wood. Make two of each side and you’re ready to assemble.
Step 11
Place your frame pieces face side down on your work surface. Set a couple of pieces of scrap inside your frame the same depth as your sign wood, which, in this case is ¾”. That will allow you to have a recessed look so that your sign will set flush to the wall.

Next, lay down your face down inside the frame. Clamp all the pieces together and assemble with your drill and screws into the pocket holes, and nail together the mitered corners with a couple of 1″ brads.
THE REVEAL
Last, add your choice of hanger to the back and you’re done! I like to use keyhole hangers for heavier items, and a wire hanger for smaller wall art.

My goal was to inspire you to give DIY a try and I hope I achieved that. I had a blast creating these signs and I know you will too.


There’s nothing more fulfilling than creating your own home story with your own created pieces, and, of course, thrifted finds. In addition, there’s no need for a huge budget, just a bit of know-how and gumption. Isn’t that a fun word?


Most everything in this photo is thrifted or handmade, including my repurposed antique clamp sconces. You can do it!


In addition, do pin and share this DIY antique store sign tutorial to inspire others to give DIY a try too. Likewise, creating and sharing is what I’m all about.


Up next, these old pickle jars and scraps of wood will become something entirely new. Any guesses? Head HERE to see.

Before you go, be sure to sign up for my newsletter. Until next time!

While you’re at it, here are more fun projects like my DIY antique store sign:


Hi ! Love your creativity! Saw you use spray adhesive while making the sign. Please be careful
with the fumes and dust you’re around. Some are toxic and if you don’t want to grab for a mask,
it’s a handy idea to have a fan blowing the air away from you. Take Care!
Thank you. Yes, I use a respirator and spray outdoors. This project doesn’t use much, but users should follow the precautions on the can.
Hi Larissa, this is a great tutorial and a lovely sign…I couldn’t help but notice the “Seeds That Really Grow” feedsack that I sent you two? years ago…I’m tickled pink that you are using it as a pillow?
Yes! We all love it and it means so much to us in more ways than one. Thank you!
Love the sign. Thanks for the tutorial! Can’t wait to see what your creative mind comes up with using the pickle jars and scrap wood!
Thank you! I’m excited to share. 🙂
Beautiful signs! Thanks so much for showing another option for making letters for those of us who don’t have (and can’t afford to get!) an electronic die cutting machine.
Thanks also for the demo of the Kreg Jig! 🙂
My pleasure! I truly love to hand-paint, but sometimes changing it up is fun too. Glad you liked my demo! 😀
I love the new sign Larissa!! What a great find. I’ll have to remember to check the clearance bin! 🙂 xo
Thanks so much, Nancy. I had a blast!
What a cool DIY sign project, Larissa – it looks huge! It would make an awesome statement piece on someone’s wall. I’m sure it will sell quickly from your shop. 🙂
It can be big or small and that’s what’s so fun about it. Thank you, Jen! 😀
This is so freakin awesome, Larissa!! This might be my favorite project of yours!! XO
Hooray! You’ve made my day, Christy. Thank you!
Thank you so much I love it
I’m happy to hear it. 🙂
Love this sign! Thank you for the tutorial! You are an inspiration!!
My absolute pleasure!! Thank you.
Hi,
What font size and letters did you use
You would just size it to fit the size sign you are making. 🙂
So the larger sign measurements were 40×30?
It was more like 48″ x 37. I used what I had on hand. 🙂