Are you ready for round 2? If you’re new to what I’m talking about, take a peek at my first post about these broken chairs over HERE. Now, for today’s fun I’m finishing up what I originally began. These upcycled chair parts are destined for so much more. Let’s have some more DIY fun!

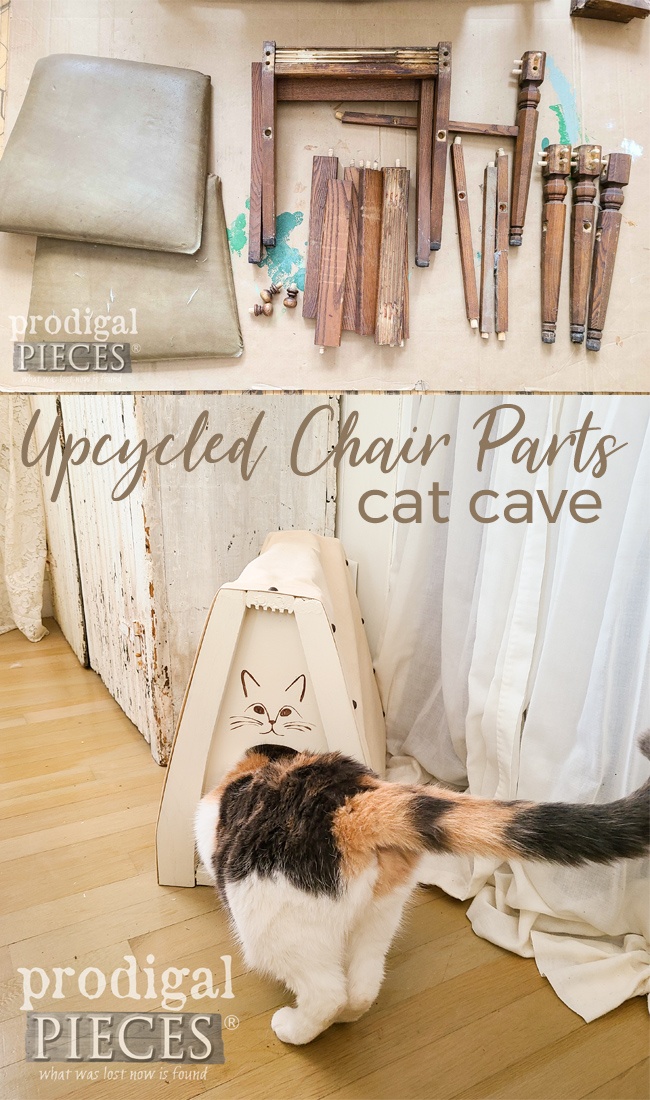
While this may look like a pile of hot mess-ness, don’t be too quick to judge, k? I see wooden seats, solid oak legs and rails. In my first chair take-down, I cut off the backs and made salvaged spring decor.

DIY TIME
This time around, I making use of the pieces left. First, I’m using the rest of the backs, the bottom legs. After flipping them around figuring out their best use, I then decide to cut off the dowel pins with my coping saw.

Then, after assembling a few cut chair pieces, I came up with this…

Well…what is it? Before I give away my wicked upcycling scheme, I also make use of the seats. I cut the seat bases to fit both ends, and then cut up the foam seat cushion to make a different sort of cushion.

THE REVEAL
Finally, after a bit more of building, sewing adventure, I’m finished.


Were you thinking a DIY cat cave? tee hee! I couldn’t un-see it, so there it is. And…I had to put it to the test. Now, in all fairness, Lily (our diva calico cat) is more of an outdoor cat as she came from a barn. Likewise, she claims our house as her castle. Finally, here she is with her first impression. She marks it.


And then…takes a peek. Silly cat. Apparently, she wasn’t super impressed. However, I will say she did more than I thought she would.


I pass muster by Lily standards and that says a lot. What say you?
If you’d like to treat your furry friend to a cutie bed, you can find it available in my online store along with other fun finds.


In addition, pin and share my upcycled chair project because you just know there are other dumpster potentials just waiting to be revived.
Oh, and stay tuned to see what Lily thinks of the rest of this chair upcycle. See Part 3 HERE.

Before you got, be sure to sign up for my newsletter. Until next time!

Also, more DIY fun like my upcycled chair parts into decor:


You are a never ending well of creativity!!! Sooooo adorable!!! If only my fat cats could fit through the door!!??
Thanks! Fat cats can fit…plenty big. 😀
OMG, I did not see that coming, Larissa! That is one PURFECT upcycle my friend. That cutie is going to fly out of your shop.
I know you understand how fun it is when an idea strikes…I couldn’t wait to work on it. Sending you a snowy hug, Marie!
the cat bed turned out adorable,
Thank you bunches, Nancy! 😀
Oh my goodness, that is just so precious!!! I once had a “princess” calico cat and she was most impressed with her little self. This is such a very cool “hidey-hole” and your drawing is perfect! Great job, as usual!
tee hee! Calicos are the best. She is such a sweetie. Thank you for the love.
Now, if THAT isn’t creativity, I don’t know what is! Amazing! ?
Happy dance!! Thank you so much, Becky!
That is so very clever! WOW!!
Lily is a cutie.
And she knows it. hee hee. Thanks, Michele!
This is SOO cute Larissa! I didn’t see it coming either, as others have stated. 🙂 Your creative mind never ceases to amaze! Adorable!
Well, I’m so glad you enjoy my work, Mary. It means much! Thank you. 🙂
NEVER saw that in those pieces!
Another creative creation! You’re so clever!
I’m so glad you enjoyed it, Susan. Thank you!!
I love it! What a fantastic idea! Never saw anything like it and it is from recycled materials!
I truly have fun sharing with you, Cheryl. Thanks!!
Hi Larissa, well, I certainly didn’t “see” that in the pile of of chair pieces! That is just fantastic, and a perfect kitty cat castle! I love your artwork above the opening!
I couldn’t un-see the cave once I stood the parts up. I’m not much for posh pets, but this just seemed right. Thanks, girl!