It’s the Christmas season and what better way to enjoy this special time than being inspired by others and getting the itch to create? I am pleased to share with you my repurposed log reindeer.
Speaking of my leg of the tour, my contribution to help you get your craft on is this sweet, but rustic and repurposed log reindeer. Isn’t he cute? I’ve named him Buck. tee hee.

Back in the summer I acquired a five-gallon bucket of old rusty railroad spikes and couldn’t wait to put them to use. My first project was my rustic pumpkins in the fall. Now my little repurposed log reindeer is sporting these gorgeous legs.

However, I realize you don’t all have access to such rusty treasures like these spikes, but you can still make this reindeer using branches for legs as well.
TERMS OF USE: when you build these repurposed reindeer you agree to the following: it cannot be shared or distributed for monetary gain in any way, it may not be modified in any way, and you may not claim the work as your own.
Let’s get started! Here’s what you’ll need:
- 4″ diameter log cut to 8-9″ length
- 3″ diameter log cut to a 4″ length
- 1″ diameter branch cut to a 5″ length
- 4 railroad spikes (or 4 – 1″ diameter branches approx. 12-18″ long)
- scrap leather for the ears and tail (you can cut up a thrifted purse)
- wood glue<
- table saw
- jigsaw
- drill
- spade bit set
- branches for antlers
- scrap of red flannel or cotton for scarf approx. 18″ long (optional)

First, be safe when using these power tools and wear protective eye wear and ear plugs. Now you’ve used your table saw to cut the wood to length, let’s get ready to assemble. Then, take your neck piece and using your table saw or jigsaw, give each end an angled cut, making sure the angles are opposing.

NEXT STEPS
In the next step, this is where having a set of spade bits comes in handy.

Next, find a bit that is the same diameter as your neck piece. Drill into the head at a slight angle. Do a dry fit and put the neck into the head as shown.

In addition, grab your body piece and drill a similar hole as you did in the head, also going in at an angle.

Again, do a dry fit to make sure all is good and then disassemble. Time to add the legs. Roll the log over to opposite side of the head hole and place your leg holes where you see fit using a bit that will accommodate the spikes or branches you will be using for legs.

ASSEMBLE
Pound in the spikes or branches, then assemble your reindeer using wood glue. Next, we’ll add the branch antlers using a drill bit the size of the branches or twigs you find.

However, placement is completely up to you, but I chose to put my ears to the side and the antlers on top pointing outward.
The, for the ears, I used some scrap leather from our Pottery Barn Knock-off bench and cut two ears and a tail. I have also used leather purses from a thrift store like I did in my feed sack purse.
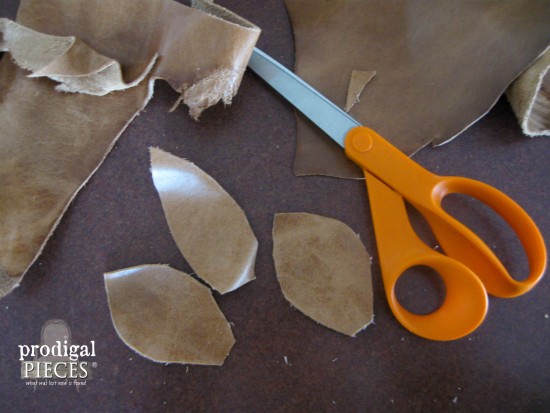
Using the drill, make holes below the antlers and on the side with a ¼” drill bit. Also, be sure to add a few drops of glue into the hole. Pinch the ends of the leather to form a pleat then insert into the hole using a screwdriver to push it in.

Last, add your scrap of red flannel or whatever fabric you choose and your little creation is ready to deck the halls!

SO CUTE
Not only is the best part about this that these reindeer can be a part of your decor all year round, but also they add that rustic style I adore.

Not into DIY or looking for a last-minute gift and you want one of these little fellas for you own? Just head to my online store where you can find them ready for the holidays.

I hope you’ve enjoyed this tutorial for my repurposed log reindeer. If you’re hoping to see the rest of my Christmas decor.
Do pin and share so others can be inspired too! ♥

To get these DIY tips & tricks in your inbox, be sure to sign up for my newsletter. Until next time!

Also, more holiday goodness like my repurposed log reindeer:


Wow! He is adorable! Clever idea using railroad spikes for legs! He’s just too cute!
I’m so happy you like it, Susuan! Thank you.
I love him! We made some birch wood reindeer last year and I still love them so much this year! 😉 Sometimes things don’t last that long around here, but he has!!! 😉
I bet it’s a treasure in your home. They’re so fun to have! Thanks for stopping by, Lindsay.
Oh goodness, he is too cute!! XO
Thank you, Christy!
He is just adorable. And the special touch is the little scarf!! I’ll have to go look for some scrap wood.
Go for it! You won’t be able to stop smiling when you make one. 😀
Larissa, he is adorable…(I think its a he…I didn’t check underneath…:) )
Love it!
Hugs,
Karin
hahahaha…yup. I think the antlers give it away, but I’ll check. 😉
This is one of the cutest reindeers I’ve ever seen! I love the railroad spike legs. My great grandfather was a railroad engineer so I would love to have something like this for our hearth. You’re so creative!
That’s wonderful, Angie! You need to find yourself some and get a Buck in the works.
Too cute! Love your reindeer! So festive and cheery!
Thanks so much, Sherry!
Buck is adorable and what makes him so special is those leather ears and tail and railroad tie legs! I just gave my son the railroad ties we collected from an old railroad line in BC a couple of summers ago. I’m going to show him this post so he can decorate his fireplace mantle with Buck’s sibling. LOL
Buck is so cute!! I love how you made his legs out of railroad ties. When I first looked at your picture I thought that his tail was a magnolia leaf. I like the idea of a leather tail much better.
Ha! I can see how you would think a leaf. Cool. Yes, he had to have some buckskin leather. 😉
Oh how cute!….I love the way you used those railroad spikes….I have a similar reindeer that was homemade and gifted to me…but got to say…yours is amazing!!!!…
What a wonderful gift to receive! I bet it’s a treasured piece in your home. Thank you for the love!
This is one of the absolutely cutest Christmas crafts I’ve ever seen! Now I want one. Pinning this adorable cutie
Now all I need are some bottle brush trees, right? 😀 I just happen to have some in my stash. Yay!
Buck is adorable, but he looks sad. I think he needs a companion, perhaps a friend with doe-lful eyes.
hahaha…thanks, Sharon. 🙂
Buck is adorable and unique. I love the extra touches like the legs and ears.
Thank you, Debra! He’s a welcome addition to our home.
Oh my word that is adorable. Great job!!!
Thanks, Kim! My kids couldn’t stop giggling when I showed it to them. I think we have a new family member. 😉
Oh my cuteness!!! So clever… love the use of railroad spikes!
tee hee. 😀 Thank you, Maryann!
You are so creative, this is amazingly adorable. Always inspired by you and your gift!
Aww…thank you, Kim! I am blessed to do what I do.
Buck is so cute Larissa!! Love how you used the spikes for the legs!! So clever and creative!!
Gotta love some wood and rusty metal, eh? Thanks for the love, Sam. 😀